Welcome to ONGC Hazira Plant Intranet
PART I
1 INTRODUCTION
1.1 DESIGN BASIS / DESIGN CAPACITY
1.2 FEED/PRODUCT CHARACTERISTICS
1.3 FEED/PRODUCT B/L CONDITIONS
1.4 REVAMP PHILOSOPHY
1.5 UTILITIES SPECIFICATION AND CONSUMPTION
1.6 EQUIPMENT LIST WITH BROAD SPECIFICATION
1.7 LIST OF ALARMS AND TRIPS
1.0 INTRODUCTION:
Oil and Natural Gas Corporation has set up a gigantic Gas Processing Complex to receive and process about 42 MMSCMD of sour gas and associated condensate set up under Phase-I, II, III and III A. The processing facilities at Hazira consist of Gas Sweetening, Dehydration, Dew Point Depression, Sulphur Recovery, and Condensate Fractionation Units. The complex has an LPG recovery unit to process 5.3 MMSCMD of Sweetened Gas. The lean Gas from the LPG unit is supplied to IPCL Dahej for C2-C3 extraction. The remaining Gas of about approx. 35 MMSCMD is supplied to GAIL through the HBJ pipeline. The gas after C2-C3 extraction is routed back to Hazira for supply to Local Consumers viz, KRIBHCO, ESSAR, GGCL, RIL etc.
The NGL produced from CFUs contains appreciable amount of Kerosene (about 12 - 16 %) and Aromatics. The NGL produced from LPG does not contain Kerosene and it is equivalent to Aromatic Rich Naphtha. The "Kerosene Recovery Unit" was designed to extract the value added products from NGL produced from the CFUs.
Initially when KRU was designed in 1988, the Phase-III and III-A Facilities for additional Gas handling and condensate fractionation were not conceptualized. Hence the processing of Gas and associated condensate up to Phase-II expansion for about 22 MMSCMD was considered as the basis of design of KRU with NGL as feed stock i.e. for 1.07 MMTPA production of NGL from the above expansion.
With the increased availability of Gas and associated condensate from offshore and the enhanced processing facilities at Hazira, with Phase-III and III-A, the resultant increase in the quantity of NGL produced is also considered for processing in KRU. Hence the earlier design philosophy was revamped accordingly. The quantity of NGL was expected to increase from 1.07 MMTPA to 1.7 MMTPA. Out of this 1.5 MMTPA from CFUs and 0.2 MMTPA from LPG unit.
As LPG NGL was not having Kerosene Potential the KRU was revamped to 1.5 MMTPA. Plant design was done so as to have a turndown rate of 40% of the designed capacity i.e. 0.6 MMTPA of NGL.
-', |
Vol % | D86 ASTM deg. C |
IP | 43.2 |
5 | 48.0 |
10 | 67.4 |
20 | 76.2 |
30 | 86.7 |
40 | 98.5 |
50 | 108.6 |
60 | 120.4 |
70 | 135.0 |
80 | 158.8 |
90 | 201.4 |
95 | 248.6 |
EP | 265.9 |
Revised NGL ASTM analysis provided by ONGC on 23rd Sep 1993 for carrying out revamp study of KRU.
NGL FEED COMPOSITION
COMPONENT MOLE % D86 ASTM deg. C | |
230 – abp | 0.544695 |
239 – abp | 0.511401 |
245 – abp | 0.422538 |
247 – abp | 0.387382 |
255 – abp | 0.335458 |
264 – abp | 0.315476 |
272 – abp | 0.293532 |
275 – abp | 0.302362 |
280 – abp | 0.121761 |
289 – abp | 0.114705 |
297 – abp | 0.108112 |
305 – abp | 0.101971 |
306 – abp | 0.198151 |
314 – abp | 0.162297 |
326 – abp | 0.160872 |
335 – abp | 0.125186 |
344 – abp | 0.081727 |
465 – abp | 0.312386 |
SUM | 100 |
COMPONENT MOLE % D86 ASTM deg. C | |
Water | 0 |
Nitrogen | 0 |
1 – Pentane | 0.421097 |
n – Pentane | 0.412295 |
n- Hexane | 0.834702 |
5 - abp | 0.899906 |
14 – abp | 0.807451 |
22 – abp | 0.748514 |
30 – abp | 2.717838 |
39 – abp | 3.220195 |
47 – abp | 3.244758 |
55 – abp | 6.398471 |
64 – abp | 6.627272 |
72 – abp | 6.559434 |
74 – abp | 0.569622 |
80 – abp | 6.837409 |
89 – abp | 7.077140 |
95 – abp | 1 .413043 |
97 – abp | 6.627734 |
105 – abp | 5.968911 |
114 – abp | 5.432989 |
122 – abp | 4.514456 |
125 – abp | 0.984215 |
130 – abp | 3.177813 |
139 – abp | 2.550122 |
147 – abp | 3.310271 |
155 – abp | 2.21716 |
156 – abp | 0.773437 |
164 – abp | 2.034759 |
172 – abp | 1.843927 |
180 – abp | 1.518781 |
185 – abp | 0.541396 |
189 – abp | 1.129655 |
197 – abp | 1.004705 |
205 – abp | 0.792151 |
214 – abp | 0.725606 |
215 – abp | 0.344982 |
222- abp | 0.627829 |
-', |
___ _ |
CHARACTERISTICS OF NGL (CFU TR 71)
DENSITY AT 15° C | 0.745 |
SPECIFIC GRAVITY AT 60/60 F | 0.745 |
GRAVITY API AT 60° C | 58.480 |
REID VAPOUR PRESSURE Kg/Cm2 AT 38 °C | 0.330 |
DOCTOR TEST | -VE |
HYDROGEN SULPHIDE, PPM MERCAPTION | ND |
SULPHUR, PPM | 4.800 |
SULPHUR TOTAL PPM | 45.200 |
NITROGEN TOTAL ,PPM | 7.900 |
COPPER STRIP CORROSION 3 HRS. AT 50 C | 1.000 |
MOLECULAR WEIGHT | 128.90 |
C/H RATIO( WT.) | 6.540 |
CHARACTERISATION FACTOR KUOP | 11.860 |
TRACE METALS,PPB | |
COPPER | 8.300 |
LEAD | 1.000 |
DISTILLATION ASTM D 86 (AET) | |
IBP | 43.200 |
5% VOL. RECOVERED AT C | 48.000 |
10% VOL. –DO- | 67.400 |
20% VOL. –DO- | 76.200 |
30% VOL. –DO- | 86.700 |
40% VOL. –DO- | 98.500 |
50% VOL. –DO- | 108.60 |
60% VOL. –DO- | 120.40 |
70% VOL. –DO- | 135.00 |
80% VOL. –DO- | 158.80 |
90% VOL. –DO- | 201.40 |
95% VOL. –DO- | 248.60 |
FBP, C | 265.90 |
TOTAL RECOVERY, % VOL. | 96.40 |
RESIDUE, % VOL. | 2.40 |
LOSS, % VOL. | 1.20 |
CHARACTERISTICS OF NAPHTHA CUT IBP -140OC
Composition on NGL , % wt. | 1.0 – 70.8 |
Composition on NGL , % vol. | 1.2 – 73.0 |
Yield on NGL , % wt. | 69.8 |
Yield on NGL , % vol. | 71.8 |
Density at 15 C, kg/L | 0.7214 |
Specific gravity at 60/60F | 0.7216 |
Gravity deg. API at 60 F | 64.6 |
Reid vapour pressure, kg/cm2 at 38O C | 0.46 |
Doctor Test | - VE |
Hydrogen Sulphide, ppm | Nil |
Mercaptan Sulphur, ppm | 5.1 |
Sulphur total, ppm | 6.1 |
Copper strip corrosion 3hrs. at 50 O C | One |
Nitrogen, total ppm | 1 |
Research Octane number(clear) | 67.6 |
Molecular weight | 110.7 |
C/H ratio(wt.) | 5.75 |
Characterisation factor Kuop | 11.89 |
Trace metals, ppb_ | |
Lead. | 2.7 |
Arsenic | 1 |
Distillation ASTM D86(AET) | |
IBP, deg. oC | 40.4 |
5% vol recovered at, deg oC | 47.7 |
10% vol. -- do - | 58.2 |
20% vol. -- do - | 64.3 |
30% vol. -- do - | 70.7 |
40% vol. -- do - | 76.5 |
50% vol. -- do - | 84.5 |
60% vol. -- do - | 90.9 |
70% vol. -- do - | 97.1 |
80% vol. -- do - | 105.0 |
90% vol. -- do - | 113.0 |
95% vol. -- do - | 120.0 |
FBP, deg.C | 130.3 |
Total recovery, % vol. | 99.1 |
Residue, % vol. | 0.5 |
Loss, % vol. | 0.4 |
CHARACTERISTICS OF KEROSENE CUT IBP 140OC TO 306.5OC
Composition on feed I %wt. | 70.8-100 |
Composition on feed, % vol. | 73.0-100.0 |
Yield on feed, % wt. | 29.2 |
Yield on NGL , % vol. | 27.0 |
Density at 15 C, kg/L | 0.8032 |
Specific gravity at 60/60F | 0.8035 |
Gravity deg. API at 60 F | 44.6 |
Doctor test | -VE |
Hydrogen sulphide, ppm | Nil |
Mercaptan Sulphur, ppm | 2.8 |
Sulphur total, ppm | 163.5 |
Copper strip corrosion 3hrs. at 50 C | 1 |
Nitrogen, total ppm | 28.7 |
Smoke point ,mm | 22.0 |
Flash point(Abel), deg. C | 42 |
Aniline point, C. | 58.2 |
Diesel index | 61.0 |
Average molecular wt. | 266 |
C/H ratio(wt.) | 6.79 |
Characterisation factor(KUOP) | 11.7 |
Distillation ASTM D86(AET) | |
TBP, deg. C | 143.2 |
5% vol recovered at, deg C | 150.8 |
10% vol. -- do - | 159.2 |
20% vol. -- do - | 163.2 |
30% vol. -- do – | 167.2 |
40% vol. -- do – | 173.4 |
50% vol. -- do - | 181.5 |
60% vol. -- do - | 191.4 |
70% vol. - - do – | 205.1 |
80% vol. -- do – | 226.9 |
90% \/01. - - do – | 255.6 |
95% vol. - - do | 276.5 |
FBP, deg.C | 306.5 |
Recovery, % vol. | 96.5 |
Residue, % vol. | 2.0 |
Loss, % vol. | 1.5 |
1.1 DESIGN BASIS
The design capacity of KRU is 1.5 MMTPA (189.39 M.T per hour) of NGL from CFU trains, on 330 working days basis.
NGL | Parallel Operation | Series Operation |
PRODUCTS: | ||
ARN | 1.1 MMTPA | 751715 TPA |
KEROSENE | 0.4 MMTPA | 285320 TPA |
HEAVY CUTS | NIL | 32965 TPA |
NO. OF STREAM DAYS | 330 | 330 |
TURNDOWN % OF MAX. CAPACITY | ** | 40 |
NO. OF TRAINS | 2* | 1 |
* Effectively with parallel column operation two independent trains of KRU are available. Capacity of train # 1 (i.e. 90-C-901) is 1.2 MMTPA, while that of train # 2 (i.e. 90-C-902) is 0.3 MMTPA.
** Turndown of each shall be dependent on the turn down available in each of the two heater reboilers (Viz. 90-H-901 Train #1 and 90-H-902 Train #2). Turn down on normal operating loads for 90-H-901 is 65% whereas for 90-H-902' no turndown is possible.
1.2. FEED/PRODUCT CHARACTERISTICS
Feed Product characteristic are as below:
NGL
Series Operation | Parallel Operation | |
Specific Gravity | 0.7425 | 0.7425 |
Vapour Pressure | 0.65 kg/cm2 a | 0.65 kg/cm2 a |
ARN
Specific Gravity | 0.720 to 0.724 |
TBP Cut | IBP to 140 oC |
ATF
Specific Gravity | 0.7750 to 0.8400 |
Conductivity | 40 – 450 ps/m |
--------- |
' |
_ |
KEROSENE
Flash Point | 35(min) |
Smoke Point mm | 18 (min) |
TBP Cut | 140 – FBP C |
Specific Gravity | 0.799 to 0.8 |
HIGH SPEED DIESEL
TBP Cut | > 300o C |
Specific Gravity | 0.82 – 0.86 |
Viscosity | < 2 cst |
1.3. FEED/PRODUCT B/L CONDITIONS
PRESSURE kg/cm2 a | TEMP. OC | SOURCE | DESTINATION | |
NGL | 5.2 11.5 | 150 35 | CFU FROM STORAGE (during reprocessing) | |
ARN | 4.0 | 43 | STORAGE TANKS | |
KEROSENE | 3.0 | 43 | KEROSENE STORAGE TANKS | |
HEAVY CUTS | 2.8 | 45 | STORAGE TANK |
(in case of parallel operation no heavy cut is envisaged)
1.4 REVAMP PHILOSOPHY
The purpose of KRU is to fractionate the NGL from CFUs into ARN and Kerosene. Kerosene has a TBP range of about 140O C to 290OC. ARN, which is lighter than Kerosene is having FBP of 140OC.
The composition of NGL considered for the earlier design of KRU contained a petroleum cut heavier than Kerosene. Therefore in order to produce Kerosene of desired specifications a series of 2-column operation was envisaged. The first column (Naphtha Column) fractionated ARN from the rest of NGL and the second (Kerosplitter) separated out Kerosene from the heavier Petroleum cut.
In view of the change in composition of the condensate received at Hazira the NGL has become leaner. Therefore to produce only ARN and Kerosene of required specifications, a single column operation was envisaged to be adequate.
Hence the capacity of KRU can also be increased by utilising the Kerosplitter as Naphtha Column in parallel with already envisaged Naphtha Column. In this way, there will be two parallel trains for NGL fractionation independent of each other in operation.
If at a later stage, there is a change in quality of condensate received at Hazira and NGL becomes heavier then the provision of operating these two columns in series as designed originally also exists.
Having accepted the above revamp philosophy in principle, the adequacy of Kerosplitter and TB reflux and reboiler circuits have been checked for the revised flow and operating conditions. Naphtha column was also re-checked for the revised NGL composition. The adequacy checks have been carried out for all the process equipments and the supporting utilities off Sites and flare systems.
1.5. UTILITIES SPECIFICATION AND CONSUMPTION
All the utilities requirement for the unit is instrument air, cooling water, LP Steam, IG, Plant air, Service water. All are taken from the existing facilities in the complex.
Flare System
The flare loads for KRU are routed through the 30" flare and hooked up with the main flare near DPD Ph-III.
The revised flare load from KRU is:
Earlier Revised
Peak flare load 205 T/hr. 190 T/hr.
The main flare is adequate to handle the above revised load. The unit flare KOD 90-V-904 is also adequate for the revised loads.
Flare load from KRU is by pop of PSV's on the two columns. Since both column overheads are cooled by air, cooling water failure for flare load is not considered. The reboiler circulation in Naphtha column and preheated feed to the Kerosene column is by Motor driven Pumps.
On complete power failure (total blackout) KRU feed will also stop from CFUs.
In case of total KRU power failure, Air-cooling fans will fail and the flare load is estimated to be 183.43 TPH with M.WT 105.8.
l.5.1 Re-circulation: Cooling Water System
Majority of the process cooling requirement for KRU is met by air cooling. Since the outlet temperature from air coolers is limited to 60°C, further cooling to product storage temperature has to be done using cooling water. Hence, cooling water is mainly used in trim coolers E-904 & E -907. It is also used in Kero Column Bottoms Cooler E- 908, E -909 AB and E-911 AB.
The total cooling water requirement of Phase I & II and KRU along with installed capacity is as follows :
Requirement (m3/hr) | Installed capacity (m3/hr) | |
Phase I | 10190 | 15000 |
Phase II | 6990 | 7500 |
KRU | 161.5 | 43 |
Total | 17341.5 | 22500 |
From the above comparison, it is evident that the small cooling water requirement for KRU can be easily met from the existing facilities. Hence no new facilities were envisaged
1.5.2 Compressed Air System
The total air requirement of Phase I & II and KRU are as follows-:
Phase I | Phase II | KRU | Total | |
(NM3/hr) | (NM3/hr) | (NM3/hr) | (NM3/hr) | |
Instrument Air | 2520 | 1230 | 200 | 3950 |
Plant Air | 850 | 500 | 170 | 1520 |
Total | 3370 | 1730 | 370 | 5470 |
The installed compression capacity at present is 6275 Nm3/hr. Since the total instrument air requirement after commissioning KRU is only 3960 Nm3/hr, no new air dryers are required.
1.5.3 Inert Gas System
As per initial design inert gas is required mainly during start up or total shutdown, for purging air / hydrocarbon containing systems. In KRU no continuous requirement was envisaged. However presently IG is being used for maintaining the pressures in C-901 & C-902 (as make up) and for seal cooling in P 901 A/B and P 903 A/B/C.
The normal and maximum requirements for Phase I, Phase II and KRU are summarized below:
For calculating the total maximum requirement, it is assumed that two hose stations at full capacity will be used apart from normal requirements.
Requirement (Nm3/hr) | ||
Normal | Max. | |
Phase I | 130 | 300 |
Phase II | 50 | 220 |
KRU | --- | 170 |
Total | 180 | 520 |
The installed capacity of the two existing inert gas plants is 300 Nm3/h each. The normal requirement of inert gas can be met by operating only one IG unit at 60% capacity. To meet the maximum demand after KRU was commissioned, both the IG units would required to be operated at 85% capacity.
From the above analysis of demand and capacity, it is concluded that no additional facilities for inert gas generation are required.
1.5.4 Power, Steam Condensate and Soft Water System
In KRU, a small quantity of LP steam is required intermittently in fired heaters H-901 & H902 for snuffing /lancing/ emergency purposes. It is also required at hose stations and for tracing of lines.
The total power requirement of Phase I &- II and KRU are as follows :-
LP Steam (tons/hr) | |
Phase I | 88.0 |
Phase II | 65.2 |
KRU | 4.60 (intermittent) |
Total | 157.80 |
The existing facilities are capable of generating 315 tons/hr of LP steam (210 tons/hr from CPP and 105 tons/hr. from Sweetening boiler). Thus the small requirement of LP steam in KRU is easily met.
After KRU modification in the year 1999 an MP steam exchanger E-912 has been installed as a pre-heater of the NGL fed to C-901.
The total Power requirement of Phase I, II and KRU are as follows :-
Power (MW) | |
Phase I | 25 |
Phase II | 9.4 |
KRU | 0.8 |
Total | 35.2 |
The installed capacity of the existing captive Power Plant is 19.5 x 2 = 39 MW.
Hence, the small power requirement for KRU can be easily met.
1.5.5 Raw Water System
Since there is no requirement of a new cooling water system after KRU is commissioned, the existing raw water system is adequate. There is an intermittent requirement of 10 m3/h service water in KRU at hose stations. The service water requirement of Phase I & II is 130 m3/h. Existing Service Water pumps have a capacity of 150 m3/hr. Hence the requirement of KRU can be easily met by the existing facilities.
1.5.6 Product Storage & Transfer system
At the time of commissioning the products from NGL fractionation Unit were Kerosene, Aromatic Rich Naphtha (ARN) and Heavy Cuts. Their annual production figures were as follows:
Series Mode | Parallel Mode | |
Kerosene | 285320 MTPA | 0.4 MMTPA |
ARN | 751715 MTPA | 1.1 MMTPA |
Heavy Cuts | 32965 MTPA | ------ |
PART - II
2.0 PROCESS DESIGN
2.1 PROCESS DESCRIPTION
2.1.1 SERIES MODE OF OPERATION
2.1.2 PARALLEL MODE OF OPERATION
2.2 NGL REPROCESSING
2.3 ADVANCED CONTROL PACKAGE
2.4 EFFLUENT SUMMARY WITH TABLE
2.0 PROCESS DESIGN
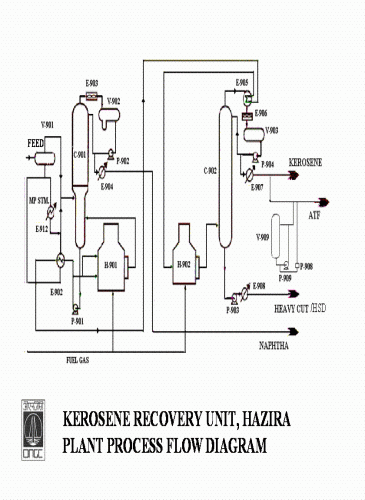
2.1 PROCESS DESCRIPTION
A brief description of the process flow scheme for the two modes is given in the following pages.
Two modes of operation are envisaged for the Kerosene recovery from NGL produced in the condensate fractionation units from CFU
(a) when the FBP of the NGL feed is greater than 290°C then the two columns (90-C-901,902) are planned to be operated in series mode to produce Kerosene as per specifications defined in the design basis I (1.2)
(b) when the FBP of the feed NGL is less than 290°C parallel mode of operation is planned under which the second column shall be used for the same service as the first column.
The Kerosene Recovery Unit is designed to fractionate 189.39 MT/Hr. of NGL out of which 163.00 MT/hr. is the feed NGL from 6 CFU trains and 11.67 t/hr of reprocessing NGL produced during annual shutdown of KRU. Reprocessing is for a period of 5.33 months (160 days) in a year (corresponding to 8.25 days NGL production).
With process optimisation and de-bottlenecking the present processing capacity is 1.45 MMTPA
The KRU consists of the following sections.
-- NGL FEED RECEIVING
-- NAPHTHA COLUMN FEED PREHEAT.
-- NAPHTHA FRACTIONATION
-- KEROSENE COLUMN FEED PREHEAT.
-- KEROSENE FRACTIONATION.
-- NGL REPROCESSING.
2.1.1 SERIES MODE OF OPERATION (Present case)
NGL from 4 trains of CFU (train 71 to 74) is taken through a common 8"header to KRU A separate 8" line is carrying NGL feed from CFU trains 75, 76, and 77 of Phase III A. This line joins the other 8" line at KRU B/L. The feed NGL from individual unit is taken upstream of the existing NGL coolers. It flows under level control and joins the main header to the KRU.
In case of KRU unit emergency shutdown automatic routing of NGL from individual unit to storage has been provided (refer P& ID 2862-0227). This requires continuous cooling water circulation in the existing NGL coolers 163.0 MT/Hr. of NGL feed is received at plant B/L at a pressure of 5.2 kg/cm2a and at a temperature of 150 oC. In order to avoid excessive flashing in the off site line, a back pressure control valve (PV-1106) is installed on the feed line. NGL is then led to a inlet surge drum (90 - V 901) operating at a pressure of 4.5 kg/cm2 a and a temperature of 135 oC.
The vapour generated due to flashing in the surge drum is fed back, under pressure control (PV-1101) to the 12th tray of the Naphtha Column (90-C-901).The liquid from V-901 flows under flow control to the Naphtha column via feed preheat section.
NAPHTHA COLUMN FEED PREHEAT
The feed to this section enters at a pressure of 2.9 kg/cm2 a and a temperature of 141.5 oC (due to pressure drop across control valve FV -1102). It is led into the feed/bottom exchanger E-902, where it exchanges heat with the bottom product of Naphtha Column and is heated to 146.5 oC . The Naphtha Column bottom product in turn is cooled from 206 oC to 175 oC. This arrangement has been provided to reduce the load on the Naphtha Column reboiler, thereby resulting in energy optimization. One stream from V-901 is heated by MP steam exchanger E-912 and liquid is heated up to 155 oC . This stream mixes with vapour liberated from V-901 and the liquid stream from E 902 . This mixture is fed to 12th tray of the column C-901.
NAPHTHA FRACTIONATION SECTION
Naphtha product has an end point of 170 oC. Naphtha column is designed to separate Naphtha from heavier components. The feed, which is a mixture of liquid and vapour, enters the column (C-90l) at the 12th tray. The column has a total number of 20 valve trays. Due to the higher vapour load at the top section the diameter is higher (3.350 M ID) as compared to the Bottom section (3.0 M ID) (Refer P&ID No.02-90-Al-111).
Column pressure is controlled at 0.625 kg/cm2 a, by four valves i.e. two valves on each side PV-1102 A1 & A2 and PV-1102 B1 & B2 which operate in split range. Set of valves PV-1102 A1 & A2 on inert gas to make up any pressure loss and set of valves PV-1102 B1 & B2 on flare line to bleed excess of pressure.
Column top temperature is maintained at around 116-118 oC. The overhead vapours are condensed in an Air Fan cooler 90-E-903 and led to a reflux drum(90- V902) operating at a temperature of 60 °C. 90-V-902 is provided with a boot to separate out any water flowing along with hydrocarbons. A part of the liquid from V-9O2 is refluxed to the column (with the help of Pumps P-902 A/B/C) under flow control (FV-1104) valve. The rest of the liquid after being cooled to 43° C in trim cooler E-904 is withdrawn under level control (LV-1103) as Naphtha product.
Since the bottom temperature of the column is very high 204-208 oC steam can't be used for reboiling. Hence a double pass fired heater (90-H-901) reboiler has been provided. The liquid to the reboiler is re-circulated using Pumps (P-901 A/B). The outlet temperature is controlled at 225-235° C by regulating the fuel gas flow to the heater.
The bottom product from Naphtha Column 90-C-901 is withdrawn under level control (LIC- 1102) and sent to exchanger 90-E-902 as described in the above section.
Since the Naphtha Column bottom product has a FBP of higher than 290°C it needs to be further fractionated in the Kerosene Column 90-C-902. In such a case, after heat exchange in heat exchanger E-902 it is sent under level control (LIC1102) to Kerosene column feed preheat section.
KEROSENE COLUMN FEED PREHEAT SECTION
The feed to this section is at a pressure of 13.5 kg/cm2 and at a temperature of 146°C. It is led to a feed/top exchanger E-905 where it exchanges heat with the Kerosene Column overhead vapours.
Feed to Kerosene column is then fed to a single pass fired heater H-902. Here 98% of it is vapourized and the outlet temperature attained is 242o C. The outlet temperature of the heater is controlled by regulating the fuel gas supply to the heater as in the case of heater H-901. 98% vapourized feed is then fed to the Kerosene column (Refer P&ID No. 02-90-A 1-113).
KEROSENE FRACTIONATION SECTION
Kerosene product has an end point (FBP) of 260 oC. Kerosene column is designed to separate Kerosene from heavier components. The feed, which is almost entirely vapour (98% by wt.) enters the column C-902 at the 21st tray. The column has a total of 21 valve trays.
The column top pressure is maintained at 0.5 kg/cm2a with the help of Inert Gas the flow of which is regulated through two pressure control valves (PV-1308 A1,A2 & PV-1308 B1,B2) in split range as in C-901.
Column top temperature is maintained at 235oC . The overhead vapours are first partially condensed in exchanger E-905 as described in above section and then fed to air cooled exchanger E-906 where they are cooled and totally condensed at 60 C . The condensed liquid is fed to the reflux drum V-903.
A part of the liquid from V-903 is refluxed to the column with the help of Pumps P-904A/B under flow control (FV-1304).The rest of the liquid after being cooled to 43°C in trim cooler E-907 is withdrawn under level control (LIC-1302) of V -903 as Kerosene product.
The bottom product Heavy Cut/HSD at 242 oC is pumped with the help of Pumps P 903 A/B/C under level control (LIC-1301) of the column to storage after being cooled to 45°C in a cooler E-908.
2.1.2. PARALLEL MODE OF OPERATION
The NGL produced in the condensate fractionation unit flows under back pressure control PV-1106 to KRU. The NGL produced in the LPG unit may or may not be routed to the KRU depending on its Kerosene content.
The distribution of NGL feed between the two trains is such that any fluctuation in flow is absorbed by train # 1 (Naphtha Column 90-C-901). This is achieved by cascading the level control (LIC-1101) of the surge drum 90-V-901catering to train # 1 with the flow control of the feed to the Naphtha Column (90-C-901). The level control of surge drum -II, 90-V-906, catering to the train # 2 controls feed to the drum itself.
TRAIN # I
NGL feed is received in the surge drum (90-V-901). The vapour generated in the surge drum due to flashing is fed under back pressure control (PV-1101) to the 12th tray of the Naphtha Column. The liquid from the drum flows under level/flow cascade control to the Naphtha column. On the way to the column it gets heated in the Naphtha feed/bottom exchanger 90-E-902 where it exchanges heat with the Naphtha column bottom product. This liquid is then mixed with the surge drum vapour and fed to the Naphtha Column 90-C-901 at 12th tray i.e. feed tray.
The column pressure is maintained with the help of fuel gas through pressure control valves PV- 1102-A1, A2 & PV-1102 B1, B2 (Refer Naphtha Fractionation Section Para 2). The Naphtha column overhead vapours are condensed in an air cooled exchanger (Naphtha Column overhead condenser 90-E-903) and led to reflux drum (90-V-902). The reflux drum is provided with a boot to separate out any water flowing along with NGL. (NGL routed directly from CFU and LPG units is not expected to contain water however, NGL coming from storage at the time of reprocessing might have some water).
A part of the liquid from the reflux drum is refluxed to the column through the reflux and transfer pumps ( 90-P-902-A/B) under flow control. The rest of the liquid after being cooled in the trim cooler (90-E-904) is withdrawn under level control as Naphtha product and routed to storage.
The column is provided with a double pass fuel heater 90-H-901 as a reboiler. The liquid to the reboiler is circulated by the Naphtha column bottom pump (90-P-901 A/B). The outlet temperature of the heater is controlled by regulating the fuel Gas flow to the heater at 288.5°C. The bottom product is withdrawn under level control 90-LV-1102 and partly cooled in the exchanger 90-E-902 described as above.
It is then cooled in the Naphtha column bottom cooler (90-E-909 A&B) before routing to storage (Refer P& ID No. 02-90-A 1-111).
TRAIN # II
NGL feed is received in surge drum II (90-V-906). The vapour generated in the surge drum due to flashing is fed under back pressure control PV-1501 to the 12th tray of the Kerosplitter/Naphtha column II (90-C-902) (Refer P&ID No. 02-90-A 1-113 & 115).
The liquid from this drum flows under flow control (FV-1503) to the Naphtha column II. On the way to the column it gets heated in the Naphtha feed/bottom exchanger (90-E-910) where it exchanges heat with the Naphtha column II bottom product. This liquid is then mixed with the surge drum vapour and fed to the column 90-C-902 at the 12th tray. The column pressure is maintained with the help of fuel gas through pressure control valves PV-1308 A1, A2, & 1308 B1,B2.
The column overhead vapours are condensed in an air cooled exchanger (90-E-906) and led to the reflux drum 90-V-903. A part of the liquid from the reflux drum is refluxed to the column through the reflux and transfer pumps (90-P-904 A/B). Under flow control FV-1304 the rest of the liquid after being cooled in the trim cooler (90-E-907) is withdrawn under level control as Naphtha product and routed to storage.
The single pass fired heater of Kerosene column feed pre-heater (90-H-902) is to be used as reboiler for the column (90-C-902). The liquid to the reboiler is circulated by the Naphtha column bottom pump (90-P-907 A/B). The outlet temperature of the heater is controlled by regulating the Fuel Gas flow FV-1303 to the heater. The bottom product is withdrawn under level control and partly cooled in the heat exchanger (90-E-910) described above. It is then cooled in the Naphtha column bottom cooler (90-E-911) before routing to storage.
2.2 NGL REPROCESSING
Reprocessing of NGL does not indicate the reprocessing of off spec products but reprocessing of NGL produced and stored in offsite tankages during the planned/unplanned shutdown of KRU.
During shutdown of KRU, the NGL produced from CFUs will be diverted to storage. When KRU is restarted it is proposed to reprocess this stored NGL.
NGL to be reprocessed is received at plant B/L at a pressure of 6.4 Kg/cm2a and a temperature of 35° C. It is heated to about 100.5° C in exchanger E-901 using the Naphtha column bottom stream emerging from the exchanger E-902 at about 147°C.
The preheated feed then flows under flow control 90-FV-1101 to surge drum 90- V-901 after mixing with the main feed from CFU.
Reprocessing of NGL is not considered for train II when the two columns are operating in parallel mode of operation.
2.3 ADVANCE CONTROL PACKAGE
INTRODUCTION
This chapter describes various online optimization and control strategies adopted in NGL fractionation unit. The advantages of such computer controlled plant operation are derived from the ability of DCS to know precisely the current state of operation, predict a new set of operating parameters for any change in the operating conditions considering various interacting constraints. The advantage of regular controls devised for the unit are described as below :
* Improved product yield and/or quality
* Reduced energy consumption
* Tighter process control
* Increased productivity of Engineers/Operators running the plant.
ADVANCED CONTROL STRATEGIES
Following advanced control strategies have been incorporated in the NGL fractionation unit.
SURGE DRUM (V-901) LEVEL CONTROL
To achieve a fairly steady operation of any distillation column, it is important that variation in the feed quantity to the column should be limited to a minimum. In the regular control scheme the liquid flow to column C-901 is controlled on cascading with level of feed surge drum through LIC 1101/FIC-1102. The change in level of V-901 affects the change in set point of FIC-1102.
Column C-901 has been designed to separate light Naphtha (ARN) as top product. The control strategy incorporated around this column aims at maximising the Kerosene yield. To attain this objective; it is desired to minimise the column operation disturbance due to the following:
Degree of reflux sub-cooling in Air cooled condenser due to changes in ambient temperature.
Vapour/Liquid ratio of the feed to column and total feed quantity.
Column operating temperature affected by change in operating pressure.
The above disturbances affect the product yield and quality and require careful monitoring of various parameters. The following advanced control scheme has been provided to closely control column operations for countering the above mentioned disturbances.
(A) INTERNAL REFLUX CONTROL (APC-ll0l)
Internal reflux is defined as the liquid leaving the top most tray of the column. For product purity to be maintained the ratio of internal reflux to the vapour feed entering the column must be held constant. For controlling the internal reflux, the following parameters have been utilised to develop the calculation module.
Vapour and liquid feed rate to column (FI-1103/1101)
External reflux rate (FI-1104) and its temperature (TI-1107)
Column top vapour temperature (TI-1106)
Any variations in these parameters is sensed by APC-1101 and it estimates the new set point of external reflux controller (FIC-1104) of the column (C-901).
(B) NAPHTHA - KEROSENE CUT POINT CONTROL (APC-1102)
The Naphtha (Column top product) is to have an ASTM end point of 140° C and kerosene is drawn as bottom product having ASTM cut range of 140-290 °C. In case there is a disturbance to the column operating conditions, the end points of these products is changed and the product quality and yield are affected.
The desired end point is fed to the cut point controller (APC-1102) as set point. The actual end point of product is predicted using sensitive tray (Tray No.5 or 9) temperature for a given product rate. APC-1102 estimates the required internal reflux to meet the desired end point specification and feeds the same as set point for APC-1101. To effect the desired control APC-1101 estimates in turn the external reflux and changes the set point of FIC-l104. (Refer P&ID No. 02-90-AI-ll1).
FURNACE (REBOILER) H-901 CONTROL
The reboiler has been provided with the following regulatory controls to counter the various change/ disturbances occurring in the column operations.
(A) REBOILER (H-901) DUTY CONTROL (FX-1201):
For any change in the feed rate to the column, the reflux to column and reboiler heat needs to be adjusted to maintain the product quality. The control of external / internal reflux is described above.
Based on feed rate fluctuations, the amount of fuel gas firing in reboiler is adjusted with dynamic lead/lag compensation. FX-1102 sums of the vapour and liquid flow rate to column C-901 and the same is utilised by FX-1201 to adjust the fuel rate to the reboiler. For final temperature adjustment FX-1201 also receives control signals from TIC-1206 located at heater outlet.
The final set point as determined by FX-1201 is given to FIC-1203 controlling Fuel Gas to the reboiler (Refer P&ID No. 02-90-A 1-113).
(B) PASS BALANCER
The Naphtha Column reboiler vapourises about 96% of process fluid entering the two passes of the furnace. The flow quantity in each pass should be essentially equal for its efficient and trouble free operation. The same is ensured by individual flow pass controller FIC-1201 and FIC-1202 (Refer P&ID No. 02-90-A 1-112).
The pass balancer scheme ensures distribution of heat between two passes in such a way that the difference process fluid temperature at the outlet of the passes remain minimum. The individual pass outlet temperatures and pass flows (TI-1204/1205) and (FIC-1201/FIC-1202) are used to calculate a weighted average temperature. A bias flow is estimated for each pass from the weighted average temperature. The sum of the bias flows for all the passes will sum up to zero. Hence a positive bias will be sent to the flow controller of the pass that has pass outlet temperature higher than average temperature. The action will be reversed if the pass temperature is lower than average temperature.
If the calculated set point for any flow controller is below a certain preset value (W.R.T cooking limit), the set point is maintained at the minimum value.
(C) EXCESS OXYGEN CONTROL
Excess Oxygen (Air) ingress to furnace leads to its inefficient operation with respect to energy consumption. An optimum air/fuel ratio ensures efficient combustion, higher flame temperature etc. The excess oxygen level in the flue gas can be regulated by manipulating the stack damper opening in a natural draft furnace. For this purpose an oxygen analyser (AT-1201) has been provided which gives set point to the controller for positioning the damper.
A minimum opening check is provided mechanically and also a furnace pressure (PI-1204/ 1202) signal is given to damper positioner overriding oxygen control to ensure furnace is not over pressurised.
GASEOUS EFFLUENTS
In normal circumstances there will not be any gaseous effluents except small quantities from occasional gas venting from some equipments. However during upset conditions safety valve discharges will occur. All hydrocarbons vapours, collected from such releases flow to the unit flare KOD (V-904). Unit flare KOD vapours from V-904 are routed to the existing terminal flare stack through a 30" flare header.
PART – III
3.0 PRECOMMISSIONING
3.1 INTRODUCTION
3.2 PRELIMINARY VERIFICATION
3.3 UTILITIES
3.4 PLANT PREPARATION
3.5 AIR DRYING
3.6 START-UP CHECK LIST
3.7 START-UP PREPARATIONS
3.8 LEAK TESTING
3.9 I.G.PURGING
3.0 PRECOMMISSIONING START-UP, NORMAL OPERATION AND SHUTDOWN PROCEDURE FOR KRU
3.1 INTRODUCTION
Pre-commissioning of the new plant is the operation in which all the jobs are to be done so that commissioning of the plant is done smoothly. It requires lot of responsibility by the Engineers, and they must possess good knowledge of process, instrumentation, pumps etc. A bad pre-commissioning would result in lot of wastage of time and money during commissioning.
The hazards most commonly occurring during start- up / pre-commissioning of a unit is air getting mixed up with H.C. and other hazards are due to over pressure mechanical problems etc. They can cause fire explosion etc.
Hence the pre-commissioning procedure given below should be followed step wise to avoid aforesaid problems during commissioning start-up, normal operation and shutdown.
3.2 PRELIMINARY VERIFICATIONS
3.2.1 PIPING REVIEW
A complete review of process piping and instrument piping must be done to ensure that piping is complete and installed as designed. This is to be checked against P & ID's.
All vent, relief and drain systems must be checked. The blinds in product lines at B/L valves are to be reversed/removed with proper entry in the blind register, which will also give the correct position of all blinds during start-up/shutdown.
VESSELS
Before closing any vessel make it sure that its interior has been inspected for cleanliness and proper installation of internal equipments.
CLEANING
Fire hoses
The isolating and blind flanges
Fire hoses
3.2.2 WATER FLUSHING
Process lines can be flushed with water through established circuits from vessels, which are filled, with water for this purpose. Water may be admitted to any vessel through temporary hose connections and flushing should be downwards or horizontal with the water exit at a low point.
Remove instruments, control valves, orifice plates, safety valves, and strainer screen and for permanent strainers provide temporary strainers from the pipelines before flushing to be started.
Make available hoses with flanges, isolating the blind flanges, strainers for occasional filtration, fire hoses.
Establish circuits with vessel which can be used for filling vessels with water and flushing is done by draining. Vent valves to be kept open while draining water from equipment.
Make proper tie-ins, hook-up, drain channels etc. with particular attention to safety requirements.
Spool pieces in place of removed components can be used if required.
Check supply of fire hydrants of utility water and compressed air.
Provide, install and remove all blinds required for flushing operation. All control valves should be dropped for flushing through main flow path and bypass.
Flushing shall be done-by fresh potable water or dry compressed air wherever water flushing is not desirable to clean the pipe of all dirt debris or loose foreign materials.
Care shall be taken during flushing so as not to damage /spoil work in supporting. Precautions shall be taken to prevent entry of water / foreign matters into equipment, Electric motors, instruments; Electrical installation etc. in the vicinity of lines being flushed.
Required pressure for water flushing shall be met by the fire hydrant pressure or utility water pressure. For air flushing the line/systems will be pressurised by compressed air. The pressure shall then be released by quick opening of a valve already in line or installed temporarily for this purpose. This procedure shall be repeated as many times as required till inside of the pipe is fully cleaned. Flush through all vents, drains and other side connections.
During flushing / air blowing design pressure should not be executed. Care shall be taken during flushing so as not to damage /spoil work in supporting. Precautions shall be taken to prevent entry of water / foreign matters into equipment, Electric motors, instruments; Electrical installation etc. in the vicinity of lines being flushed.
PRECAUTIONS
Do not forget to put back the items that have been removed or blocked during the cleaning operation. During draining operation of water, fully open all the vents in the system.
3.2.3 LUBRICATION
Lubrication of the Motors and the Machineries must be done according to the manufacturer's instructions. All valve stems should be coated with grease.
3.2.4 MECHANICAL EQUIPMENT
All electrical motors should be checked for rotation then run uncoupled for four hours. Then check alignment and install the couplings.
3.2.5 PUMPS
Verify and make sure that all pump suctions are equipped with strainers. This is to ensure the removal of any debris that has not been removed during previous cleaning operation.
Check whether unusual piping bends are being imposed on pump flanges. An alignment indicator is connected to the pump coupling and the bolt at the pump suction and discharge nozzles are loosened. A deflection of the alignment indicator shows piping strain on the pump nozzles.
Please ensure that pipe reducers located in the pump suction line are eccentric rather than concentric type.
Please check pump clearance, mechanical seals for proper installation and seal flushes for correct piping.
Under close attention of plant operators, the new pumps have to be tested with available liquid (i.e, water) for their mechanical performances. A pump should be stopped after running for several hours or whenever it shows signs of loosing suction, this is for removal, inspection and cleaning of the suction strainer. Repeat. this operation until the strainer shows no signs of accumulation, If possible, all the new pumps should be run in this manner for at least 24 hours.
3.2.6 CONTROL SYSTEM AND INSTRUMENTATION
Check the links between the control room and each instrument. Then, after the instrument air lines have been blown free of dirt and moisture, check the lines for leaks; then test all instruments for mechanical conditions and calibration to ensure that all are operable and accurate. Loop checking/stroking of all control valves is to be done from control room. Al1 instrumentation required for operation, which has not yet been installed, should now be placed in position. All instruments must be checked, calibrated and commissioned for operation.
PRESSURE AND LEVEL CONTROLLERS
Check service and preset the pressure and level instruments by simulating operating conditions. This can be done in most instances in conjunction with tightness testing and water washing, Safety valves are preset at the shop prior to installation. Therefore, take care and do not exceed the setting of these safety valves when doing tightness test or simulating operating pressures, Check and see that each instrument gives the proper signal and \ results in the proper response from the controller.
UNIT SHUTDOWN SYSTEM
Test the entire emergency shutdown system. The control valves are closed by de-energizing solenoid operated valves which close off the instrument air supply and vent the air from the valve opening mechanism.
The valves are normally open during operation, and the solenoid valves are normally energized during normal operation. Since these valves and trips can be achieved from the central control room and from several process cut off, check that each of them activates the correct valves and trips and the correct response is obtained at each point.
FLOW INDICATOR, CONTROLLERS AND RECORDERS
Orifice plates shall be installed only after the lines have been flushed and blown free. Check them for correctness of bore and where tapered bores are used, check and see that they are installed in the proper direction of flow. This should be observed by an experienced operator or start-up Engineer.
Calibrate the flow instruments and mark their coefficients adjacent to each instrument prior to the initial operation.
ALARMS
Check all electrically operated alarms to see that they are in working order and test each alarm by simulating the alarm condition to ensure that the signal activated corresponds to the proper alarm mechanism in the plant, and that the al alarm horns can be heard by the operators.
TEMPERATURE INDICATORS, CONTROLLERS AND RECORDERS
Check all temperature indicators and recorders and ensure that all the point in the recorders and indicators corresponds to the proper thermocouple in the plant and that the proper control1er reacts to the simulated conditions in the plant.
Check al1 control1ers and DP cells for calibration, and act in the correct direction.
LEVEL INSTRUMENTS:
Displacer type level instrument are calibrated by filling the chamber with clean water and using clean plastic tubing connected at the bottom drain as a gauge glass. Check calibration at zero, 10%, 50% and 90% of span, then resets the specific gravity adjustment to operating conditions. Float alarm switches are checked by removing the side outlet plug, filling the float chamber with water and observing the float and the switch actions. Gauge glasses are checked to ensure that correct gauges, gauge cocks and eliminators (where required) have been installed.
CONTROL VALVES
All control valves should be checked for conformity between specifications and name tags. All diaphragm and piston operated control valves are pneumatically stroked, using a pressure regulator and test gauge. Valve action, travel, mechanical seating and spring range should confirm to vendors name plate and jobs specification.
Valve positioners are calibrated on control valves in accordance with name plate data and specifications. Check that bypasses are not included on split range positioners and on positioners having control valve actuators requiring air loading ranges greater than 3 - 15 psi. control valve accessories such as handwhee1s, booster relays etc. should be checked to confirm that they are operational. Butterfly valves are checked for free movements of the vane into the upstream and downstream piping. Throttling butterfly valves are set for 60 degrees throttling range unless otherwise specified. See that shaft is smart to indicate proper vane position.
ONLINE ANALYZERS
All online analyzers must be calibrated and checked out. For the latter, manufacturers representative should be called in and the required calibration gases ordered well ahead of time to ensure that they will be on hand for testing and calibration.
TESTING LOOPS AND INTERLOCKS
Upon completion of installation and static testing, the control, loops are calibrated and functionally tested. This completes the final checking of the control system components as a unit, bringing together all the previous checking and testing and providing the final opportunity to discover things that may have been overlooked. It will in most cases, confirm calibration of components, set points of switches and loop action. Indicators and recorders should be zeroed and spalled with their respective transmitters’ controller output and control valve stroke should be consistent with the process control required. Interlocks should be tripped using filed contracts to checks the logic as well as to ensure that all actuators fail-safe in the proper directions. Annunciators are activated to determine that the proper alarm settings have been made. After or during loop testing, interlock actions should be tested by simulating alarm conditions to check the initial value of the variable and interlock action. Some blocking, bypassing or jumping of relay contacts may be required. A full interlock test should be made later, during safe fluid testing.
3.3 UTILITIES
3.3.1 AIR
When air is available blow all the air lines clear. After dry air is available blow all instrument air lines free of dirt and moisture prior to testing the instruments.
3.3.2 WATER
Flush all water lines until lines are clear and free of dirt, welding slags etc. Do these with enough open drains and opened flanges to be sure each line is clear before commissioning any instrumentation.
3.3.3 STEAM
After steam is available blow all steam lines clear before starting to pressure - up the system. Gradually bring the system up to operating pressure. Blow down or remove steam traps wherever possible to clean the condensate lines before allowing the condensate to return to the condensate storage tank. After activating the steam headers then blow the steam tracing., jacketing and heating lines clear and activate them.
3.3.4 SEWERS AND DRAINS
Test flow each drainage system with water to ensure there are no blockages caused by construction debris.
3.4 PLANT PREPARATIONS
3.4.1 The entire area should be cleaned of all loose construction material not required for the start-up. This is particularly important for overhead structures.
3.4.2 Fire fighting equipment should be inspected for proper functioning.
3.4.3 Warning signs or identification tags for hazards shall be painted or printed.
3.4.4 Electrical lockouts shall be identified by tags and checked.
3.4.5 All isolating valves and blinds at B/L shall be identified by tags and checked to make sure they work properly and shut completely. This is particularly important for the incoming and outgoing lines.
3.4.6 Vent lines, especial1y those connected to a vent header, shall be cleaned and checked to see that they are not full of water.
3.4.7 Al1 piping shall be air blown and steam cleaned after assembly, preferably before refractory lining work is completed .Non-return valve, internal control valves etc. should be removed before air blowing.
3.4.8 After air blowing, flanges shall be opened and vessels and equipments inspected. All foreign material and dirt shal1 be removed.
3.4.9 All normal operations preparatory to start-up shall be completed. These are to include :
Checking of all motors, pumps and compressors for alignment, rotation and vibration.
Washing of all lines, which normally contain liquid.
Checking of installation of pump strainers.
Stroking of all motor valves, checking of safety controls, of set pressures and operation of relief valves.
Commissioning and zeroing of instrument, checking of controller action and checking of emergency shutdown system.
Checking to see that all valves and control valves are correctly positioned.
3.5 AIR DRYING
Once a system is mechanically complete i.e. the unit is boxed up with all vessels internals installed (after water flushing is complete), all pre-commissioning check have been carried out and all blinds swung to their correct positions, drying with air then purging with Nitrogen or an inert gas can take place prior to pressurising with process gas.
The units should be prepared for in the following order
Air-drying
Leak testing
Purging the unit with inert gas
Flare system
AIR DRYING KEROSENE RECOVERY UNIT
A) NAPHTHA COLUMN TRAIN
1. Dry all the lines from the B/L to the surge drum 90-V-901.
Note: - The equipment will be deemed to be dry when the air venting from the system at all points is within 10% of the relevant atmospheric humidity for that time. All dead end lines must be checked for dryness during the drying programme.
2. When the surge drum is dry, open and dry the lines.
3. The 2" drain and 2" vent on the surge drum (90-V-901) may now be closed.
4. Open the block valve; purge the lines to the block valve until dry.
5. When the above system is dry, close 90-PV-1201B.
6. Open the 3/4" drain in line to column 90-C-901 and purge until dry. When dry, close again.
7. Open 90-PV-1101 and FV-1102 on manual and both block valves of each C. V. open 90-C-901 top vents and bottom drain.
Note: - Additional air hoses from the plant air system might have to be connected to 90-C-901 to give additional air velocity. Care must be taken so that the trays in the column are not disturbed.
8. Close all other drain and vents in the unit so as to have maximum velocity of drying air passing to the Naphtha Column.
9. Open the 2" drain on the line from the column to the heater reboiler. Purge until dry.
10. Open the 4" line from the column to the cooler E-901 & E-902 bypass. Purge until dry. Open bypass and through line of 90-E-902 open LV-1102 and purge line to Kerosene Storage and line to 90-E-905.
11. Open the suction and discharge valves on both reflux and transfer Pumps 90P 901 A/B and 90 P 902 A/B. Open both minimum flow lines. Open casing drain on Pumps. Purge until dry.
12. Open the upstream block valve of 90-H-901. Open FV-1201 & 1202 and purge until dry. Open the line to the Column and purge it too.
13. Open the outlet block valve of 90-H-901. Close the upstream block valve. Open manually and purge until dry.
14. Close the downstream block valve. Close 90-FV-1201, 1202. Close 3/4" drain.
15. When the column is dry. Open the drains and vents on 90-V-901. Close the drains and vents on 90-C-901 Open all drains at B/L.
16. Open 30" line to air condensers 90-E-903 and the respective inlet and outlet isolation valves of all the tube bundles.
17. Allow air to pass through vessel 90-V-902. Open 2" drain line P-90-1135 2" vent and 2" flare line 90-1103 by opening 90-PV-1102 Al/Bl and A2/B2. Purge vent until dry.
18. Open 90-E-903 suction line to pumps 90-P-902A/B. Open pump drains, vents until dry.
19. Open pump discharge line, minimum flow line to vessel V-902.
20. Open LV-1103, its bypass valves and block valves and purge line ARN to storage and line 6"-P-90-1337 ARN from C-902.
AIR DRYING KEROSENE COLUMN
1. Open SDV to Kerosene column and FIC air purge 90- V-906.
2. Open 2" vent & drain of 90-V-906.
3. Open PV to column C -902 and open FV to E-9I 0 and to column and purge.
4. Open column 90-C-902 bottom drain and top vent. Purge air until dry.
5. Open bypass valve ARN trim cooler and through coolers and pump air to 90-V-903 kerosene reflux drum. Purge the drum. Open bottom drain line 2" to OWS /CBD and pump P-904. Open the minimum flow line to V-903 and purge.
6. Open pump discharge line to 90-C-902 by opening FIC-1304 and its bypass valve and purge dry the lines. Purge the discharge line of pumps 90-P-906 A/B with inert gas. Energise the pump motors.
7. Open the LV -1302 to storage to ARN/Storage to Kerosene and purge dry this line. Open the bypass valve of this.
8. Open column bottom to pump suction of 90-P-903A/B and 6"- P-90-1336 line to Naphtha column bottom pump. Then open LV-1301 and its bypass, pump discharge block valve and kerosene trim cooler 90-E-907 and. purge up to bottom to storage of HC B/L unit area.
9. Open PV-1308 A1, B1 & A2, B2 to flare and fuel gas at the respective B/L units and surge drum.
10. From 90-C-901 dry all lines to their extremes unit the air venting from all parts is within 10% of the relevant humidity for that time.
3.6 START-UP CHECK LIST
A) Before admitting to process gas to any section of the unit or proceeding with other start-up operation, the following checks must be carried out.
Check that system is properly boxed up with all safety valves are in place.
Check that all vessel internals are fixed in position as per design.
Check that all valves, instrument, sample points have properly accessed for operation and maintenance.
Check that there is no hindrance for removal of valves, gaskets, instruments (control valve installation to be check so that such things as pipe support do not make servicing difficult.
Check the drain points are so located that entire liquid can be drained.
Check that all globe valves, orifice plate have correct flow direction.
Check that there is a correct location of steam condensate pots in relation to corresponding heat exchanger.
Check that sewer system is ready to use.
Check that all Electrical lockouts are identified by tags.
Check that all instrumentation and control systems are linked.
B) After the system is reported to be ready for operation in the respect of process, mechanical, electrical, instrumentation and control performance by the respective supervisors follows the check list as given under:
Check that all motors, Pumps and Air coolers are tested for alignment, rotation and vibration and are operational.
Check that all lines are completed.
Check to see the installation of Pump strainers.
Check that stroking of all Motor valves, checking of safety controls, checking of set pressures and operation of relief valves is completed.
Check the commissioning and zeroing of instruments, checking of controller action and checking of emergency shutdown system is completed.
Check to see that all valves and control valves are correctly positioned.
Check to see that all control valves have the correct air failure action, AFC or AFO. Check that other facilities, which are not in a position to start-up, are isolated by blinds from this unit.
Check that all instruments have been calibrated and checked seal pots filled.
Check that all necessary government approvals are obtained.
Check the emergency shutdown systems are operational.
Check that all safety valves are in position after testing. The isolation valves for the online safety valves will be in the locked open position. The spare valves are isolated.
Check that all blinds are in correct position.
Check that the flare is operational and its purge gas is inline.
C) OTHER CHECKS
Check that communication system is ready within plant and plant to control room.
Check that all necessary tools and tackles for tightening /loosening of bolts etc. are available to carry out online maintenance or standby maintenance.
GENERAL INSTRUCTIONS
Have an open vent at the top of the equipment during fill- up or draining.
During the pressure test, use of foaming products to check for leakage around the flanges.
Check the valve and pump packings.
3.7 STARTUP PROCEDURES
INTRODUCTION
In this section under operating procedures, start-up procedures are discussed. Emergency procedures are also covered in this section. The most critical periods in operation are those of start-up and shutdown. It is then, that the hazardous possibilities of fire and explosions are the greatest.
3.7.1 STARTUP PREPARATIONS
The summary or start-up procedures is as follows:
The entire system is purged with inert gas to free the system of air to less than 0.5% oxygen. Blow down system is lined up the flare and the flare header is connected to the flare tower. After displacing air, fuel gas/feed gas is taken for system drying.
Pressurising of the system will be done step wise with fuel gas and at each step of pressure rise leak checking will be carried out. Final leak check will be with fuel gas pressure up to 5 Kg / cm2g.
The various steps lending to safe and smooth start-up of the KRU unit are as follows:
a) Purging the unit with inert gas.
b) Commissioning KRU flare header closed/ blow down system.
c) Commissioning of fuel gas system.
d) System drying with fuel gas.
e) Commissioning of Naphtha column/Kerosene column.
f) Normalising the unit.
3.7.2 PRE START-UP PROCEDURES
A) PURGING THE UNIT
The entire system including the fuel gas, flare, blow down system is to be freed of air to less than 0.5% oxygen before taking in fuel gas or feed gas for drying. For purging the plant with inert gas, nitrogen produced by the inert, gas generator and supplied to the unit through inert gas header be used. Inert gas connections shall be done at various utilities connection point, drain and vents of equipment and piping to purge the system.
For purging, the unit may be divided into various systems. Purging is accomplished by depressurising to 0.5 kg/cm2G. When pressurising the system for purging care must be taken so as not to exceed the design pressure of the system under purge. After purging, the system shall be kept pressurised under a positive pressure to avoid ingress of air.
B) COMMISSIONING OF THE FLARE HEADER
After the system has been inertised and oxygen level ensured to be less than 0.5 % in flare header and blow down system, the 30" flare header from flare KO drum is integrated with the 48" flare header of Hazira Plant.
Care must be taken to equalise the pressure in the flare header for Hazira Plant before the 30” valve on flare KO drum (90-V-904) outlet is opened. Establish the, fuel gas purge to flare and blow down headers after commissioning fuel gas system.
C) COMMISSIONING OF FUEL GAS SYSTEM
Fuel gas for starting up the unit is taken through a 3" line from the fuel gas line. For commissioning of Fuel gas system, proceed as follows:
The system is already inertised and is under a slight positive pressure of Nitrogen.
Line up the system as follows:
Check all instruments and safety valves are in line.
Check steam tracing on the fuel gas line is commissioned.
3.8 LEAK TESTING
1) Examine if any temporary, blinds required to be removed which were fitted during construction and hydrostatic testing especially under safety valves. If such blinds are found, remove them.
2) Examine if all Orifice plates have been installed.
3) Close all vents and drains.
After the above general checks plant is required to be closed completely as if it is a single chamber which can be pressurised totally (i.e. all pipe work, vessels and associated' equipments) even with a single entry point for a pressurising gas.
Please proceed as follows:
Pressurise the unit with plant air gradually up to 5 kg/Cm2 or the maximum, which can be reached using plant air (please note that the test pressure must not exceed design pressure of any pipe, vessel, associated equipment). Approval of Engineer-in- charge on the test pressure to be applied for leak testing has to be obtained before pressurising the unit.
All flanges and connections must be tested for leaks using soap solution and brush. To detect small leaks tape the joints and then puncture the tape. Test the puncture with the soap solution.
For the sake of carrying out such leakage test insulation should not be put on the joints/flanges etc.
After leak checking/leak repair/ inspection certification, depressurise the unit.
3.9 PURGING WITH INERT GAS
Check the unit carefully prior to purging for temporary blinds installed during construction and hydrostatic testing, especially under safety valves. If there are any remaining, remove them. See that all orifice plates have been installed and close all drains and vents. Using steam or inert gas, proceed to purge the oxygen from all equipment as described below.
Oxygen must be removed from the process pipe work, vessels and associated equipment before the introduction of process gas and hydrocarbon liquid into the unit.
3.9.1 KEREOSENE RECOVERY UNIT
1) Turn to the closed position all process spectacle blinds at the B.L.
2) Turn to the open position all spectacle blinds that isolate one piece of equipment from another.
3) Open all Control valves, and block valves so that the entire system can be intertised up to the RL.
4) Utilizing the inert gas connections on the pump suctions, pressurize the system to 4.0 Kg/cm2a.
NOTE: If required connect inert gas hoses from the utility stations to the Naphtha and kerosene columns.
5) When the system pressure attains 4.0 Kg/cm2a.
6) Depressurise the systems at the extremes of the unit.
7) Re-pressurise the system to 4.0 Kg/cm2a with inert gas.
8) Depressurise the system at the extremes of the unit at the vessels exchanges and pumps.
9) Re-pressurise the system to 4.0 Kg/cm2a with inert gas.
10) Depressurise the system at high point vents and low points drains.
11) Re-pressurise the system to 4.0 Kg/cm2a, with inert gas.
12) Check with portable analyzer the O2 content of the nitrogen / inert gas in the system. 0.5% O2 is the maximum al1owable content in the nitrogen/ IG atmosphere within the process equipment.
13) Start to cheek at nearest point of N2 entry, check every vent and drain on pipe work, vessels, columns, exchangers and pumps etc. for O2 content of the inert gas venting, from each point.
14) Progress through the unit until 100% of the inert gas has an O2 content less then 0.5%.
15) If the O2 content is above 0.5% open that particular drain/vent and purge out inert gas until the gas has O2 content less then 0.5%.
16) If the O2 content is continues to be above 0.5%, depressurise the unit and re-pressurise to 4.0Kg/Cm2a with inert gas.
17) Continue to check through the unit until it is O2 free.
18) Repeat the above items as required until the inertisation has been satisfactorily completed.
19) Leave the unit under positive inert gas pressure after inertising so that air cannot enter the equipment.
3.9.2 FLARE SYSTEM
Flare header to be cleaned by gasket bursting with plant air before purging with inert gas. Close all vents and drains and install a pressure gauge, gasket and plates at the end of flare header.
Pressurise the flare header with plant air system pressure. Then burst the gasket to blowout the all foreign materials such as debris, welding slag and etc.
Repeat the above procedures until the flare is cleaned. Then purge with inert gas as following procedures.
1) Turn to the closed position all the spectacle blinds on the flare systems and lines leading into the system.
2) Close all other valves.
3) Open 2" vent valve on the flare K.O. drum 90- V-904.
4) Connect a Nitrogen/inert gas hose to the extreme end of the flare system
NOTE: - It will be necessary to connect hoses at more than one point to ensure that the system is O2 free.
5) Purge with nitrogen gas to the flare KO. drum.
6) With the portable analyser check the O2 content in the inert gas flow at all high point vents and drains. If the O2 is less than 0.5 vol % the flare can be judged to be O2 free.
PART – III
3.0 PRECOMMISSIONING
3.1 INTRODUCTION
3.2 PRELIMINARY VERIFICATION
3.3 UTILITIES
3.4 PLANT PREPARATION
3.5 AIR DRYING
3.6 START-UP CHECK LIST
3.7 START-UP PREPARATIONS
3.8 LEAK TESTING
3.9 I.G.PURGING
3.0 PRECOMMISSIONING START-UP, NORMAL OPERATION AND SHUTDOWN PROCEDURE FOR KRU
3.1 INTRODUCTION
Pre-commissioning of the new plant is the operation in which all the jobs are to be done so that commissioning of the plant is done smoothly. It requires lot of responsibility by the Engineers, and they must possess good knowledge of process, instrumentation, pumps etc. A bad pre-commissioning would result in lot of wastage of time and money during commissioning.
The hazards most commonly occurring during start- up / pre-commissioning of a unit is air getting mixed up with H.C. and other hazards are due to over pressure mechanical problems etc. They can cause fire explosion etc.
Hence the pre-commissioning procedure given below should be followed step wise to avoid aforesaid problems during commissioning start-up, normal operation and shutdown.
3.2 PRELIMINARY VERIFICATIONS
3.2.1 PIPING REVIEW
A complete review of process piping and instrument piping must be done to ensure that piping is complete and installed as designed. This is to be checked against P & ID's.
All vent, relief and drain systems must be checked. The blinds in product lines at B/L valves are to be reversed/removed with proper entry in the blind register, which will also give the correct position of all blinds during start-up/shutdown.
VESSELS
Before closing any vessel make it sure that its interior has been inspected for cleanliness and proper installation of internal equipments.
CLEANING
Fire hoses
The isolating and blind flanges
Fire hoses
3.2.2 WATER FLUSHING
Process lines can be flushed with water through established circuits from vessels, which are filled, with water for this purpose. Water may be admitted to any vessel through temporary hose connections and flushing should be downwards or horizontal with the water exit at a low point.
Remove instruments, control valves, orifice plates, safety valves, and strainer screen and for permanent strainers provide temporary strainers from the pipelines before flushing to be started.
Make available hoses with flanges, isolating the blind flanges, strainers for occasional filtration, fire hoses.
Establish circuits with vessel which can be used for filling vessels with water and flushing is done by draining. Vent valves to be kept open while draining water from equipment.
Make proper tie-ins, hook-up, drain channels etc. with particular attention to safety requirements.
Spool pieces in place of removed components can be used if required.
Check supply of fire hydrants of utility water and compressed air.
Provide, install and remove all blinds required for flushing operation. All control valves should be dropped for flushing through main flow path and bypass.
Flushing shall be done-by fresh potable water or dry compressed air wherever water flushing is not desirable to clean the pipe of all dirt debris or loose foreign materials.
Care shall be taken during flushing so as not to damage /spoil work in supporting. Precautions shall be taken to prevent entry of water / foreign matters into equipment, Electric motors, instruments; Electrical installation etc. in the vicinity of lines being flushed.
Required pressure for water flushing shall be met by the fire hydrant pressure or utility water pressure. For air flushing the line/systems will be pressurised by compressed air. The pressure shall then be released by quick opening of a valve already in line or installed temporarily for this purpose. This procedure shall be repeated as many times as required till inside of the pipe is fully cleaned. Flush through all vents, drains and other side connections.
During flushing / air blowing design pressure should not be executed. Care shall be taken during flushing so as not to damage /spoil work in supporting. Precautions shall be taken to prevent entry of water / foreign matters into equipment, Electric motors, instruments; Electrical installation etc. in the vicinity of lines being flushed.
PRECAUTIONS
Do not forget to put back the items that have been removed or blocked during the cleaning operation. During draining operation of water, fully open all the vents in the system.
3.2.3 LUBRICATION
Lubrication of the Motors and the Machineries must be done according to the manufacturer's instructions. All valve stems should be coated with grease.
3.2.4 MECHANICAL EQUIPMENT
All electrical motors should be checked for rotation then run uncoupled for four hours. Then check alignment and install the couplings.
3.2.5 PUMPS
Verify and make sure that all pump suctions are equipped with strainers. This is to ensure the removal of any debris that has not been removed during previous cleaning operation.
Check whether unusual piping bends are being imposed on pump flanges. An alignment indicator is connected to the pump coupling and the bolt at the pump suction and discharge nozzles are loosened. A deflection of the alignment indicator shows piping strain on the pump nozzles.
Please ensure that pipe reducers located in the pump suction line are eccentric rather than concentric type.
Please check pump clearance, mechanical seals for proper installation and seal flushes for correct piping.
Under close attention of plant operators, the new pumps have to be tested with available liquid (i.e, water) for their mechanical performances. A pump should be stopped after running for several hours or whenever it shows signs of loosing suction, this is for removal, inspection and cleaning of the suction strainer. Repeat. this operation until the strainer shows no signs of accumulation, If possible, all the new pumps should be run in this manner for at least 24 hours.
3.2.6 CONTROL SYSTEM AND INSTRUMENTATION
Check the links between the control room and each instrument. Then, after the instrument air lines have been blown free of dirt and moisture, check the lines for leaks; then test all instruments for mechanical conditions and calibration to ensure that all are operable and accurate. Loop checking/stroking of all control valves is to be done from control room. Al1 instrumentation required for operation, which has not yet been installed, should now be placed in position. All instruments must be checked, calibrated and commissioned for operation.
PRESSURE AND LEVEL CONTROLLERS
Check service and preset the pressure and level instruments by simulating operating conditions. This can be done in most instances in conjunction with tightness testing and water washing, Safety valves are preset at the shop prior to installation. Therefore, take care and do not exceed the setting of these safety valves when doing tightness test or simulating operating pressures, Check and see that each instrument gives the proper signal and \ results in the proper response from the controller.
UNIT SHUTDOWN SYSTEM
Test the entire emergency shutdown system. The control valves are closed by de-energizing solenoid operated valves which close off the instrument air supply and vent the air from the valve opening mechanism.
The valves are normally open during operation, and the solenoid valves are normally energized during normal operation. Since these valves and trips can be achieved from the central control room and from several process cut off, check that each of them activates the correct valves and trips and the correct response is obtained at each point.
FLOW INDICATOR, CONTROLLERS AND RECORDERS
Orifice plates shall be installed only after the lines have been flushed and blown free. Check them for correctness of bore and where tapered bores are used, check and see that they are installed in the proper direction of flow. This should be observed by an experienced operator or start-up Engineer.
Calibrate the flow instruments and mark their coefficients adjacent to each instrument prior to the initial operation.
ALARMS
Check all electrically operated alarms to see that they are in working order and test each alarm by simulating the alarm condition to ensure that the signal activated corresponds to the proper alarm mechanism in the plant, and that the al alarm horns can be heard by the operators.
TEMPERATURE INDICATORS, CONTROLLERS AND RECORDERS
Check all temperature indicators and recorders and ensure that all the point in the recorders and indicators corresponds to the proper thermocouple in the plant and that the proper control1er reacts to the simulated conditions in the plant.
Check al1 control1ers and DP cells for calibration, and act in the correct direction.
LEVEL INSTRUMENTS:
Displacer type level instrument are calibrated by filling the chamber with clean water and using clean plastic tubing connected at the bottom drain as a gauge glass. Check calibration at zero, 10%, 50% and 90% of span, then resets the specific gravity adjustment to operating conditions. Float alarm switches are checked by removing the side outlet plug, filling the float chamber with water and observing the float and the switch actions. Gauge glasses are checked to ensure that correct gauges, gauge cocks and eliminators (where required) have been installed.
CONTROL VALVES
All control valves should be checked for conformity between specifications and name tags. All diaphragm and piston operated control valves are pneumatically stroked, using a pressure regulator and test gauge. Valve action, travel, mechanical seating and spring range should confirm to vendors name plate and jobs specification.
Valve positioners are calibrated on control valves in accordance with name plate data and specifications. Check that bypasses are not included on split range positioners and on positioners having control valve actuators requiring air loading ranges greater than 3 - 15 psi. control valve accessories such as handwhee1s, booster relays etc. should be checked to confirm that they are operational. Butterfly valves are checked for free movements of the vane into the upstream and downstream piping. Throttling butterfly valves are set for 60 degrees throttling range unless otherwise specified. See that shaft is smart to indicate proper vane position.
ONLINE ANALYZERS
All online analyzers must be calibrated and checked out. For the latter, manufacturers representative should be called in and the required calibration gases ordered well ahead of time to ensure that they will be on hand for testing and calibration.
TESTING LOOPS AND INTERLOCKS
Upon completion of installation and static testing, the control, loops are calibrated and functionally tested. This completes the final checking of the control system components as a unit, bringing together all the previous checking and testing and providing the final opportunity to discover things that may have been overlooked. It will in most cases, confirm calibration of components, set points of switches and loop action. Indicators and recorders should be zeroed and spalled with their respective transmitters’ controller output and control valve stroke should be consistent with the process control required. Interlocks should be tripped using filed contracts to checks the logic as well as to ensure that all actuators fail-safe in the proper directions. Annunciators are activated to determine that the proper alarm settings have been made. After or during loop testing, interlock actions should be tested by simulating alarm conditions to check the initial value of the variable and interlock action. Some blocking, bypassing or jumping of relay contacts may be required. A full interlock test should be made later, during safe fluid testing.
3.3 UTILITIES
3.3.1 AIR
When air is available blow all the air lines clear. After dry air is available blow all instrument air lines free of dirt and moisture prior to testing the instruments.
3.3.2 WATER
Flush all water lines until lines are clear and free of dirt, welding slags etc. Do these with enough open drains and opened flanges to be sure each line is clear before commissioning any instrumentation.
3.3.3 STEAM
After steam is available blow all steam lines clear before starting to pressure - up the system. Gradually bring the system up to operating pressure. Blow down or remove steam traps wherever possible to clean the condensate lines before allowing the condensate to return to the condensate storage tank. After activating the steam headers then blow the steam tracing., jacketing and heating lines clear and activate them.
3.3.4 SEWERS AND DRAINS
Test flow each drainage system with water to ensure there are no blockages caused by construction debris.
3.4 PLANT PREPARATIONS
3.4.1 The entire area should be cleaned of all loose construction material not required for the start-up. This is particularly important for overhead structures.
3.4.2 Fire fighting equipment should be inspected for proper functioning.
3.7.3 Warning signs or identification tags for hazards shall be painted or printed.
3.7.4 Electrical lockouts shall be identified by tags and checked.
3.7.5 All isolating valves and blinds at B/L shall be identified by tags and checked to make sure they work properly and shut completely. This is particularly important for the incoming and outgoing lines.
3.7.6 Vent lines, especial1y those connected to a vent header, shall be cleaned and checked to see that they are not full of water.
3.7.7 Al1 piping shall be air blown and steam cleaned after assembly, preferably before refractory lining work is completed .Non-return valve, internal control valves etc. should be removed before air blowing.
3.7.8 After air blowing, flanges shall be opened and vessels and equipments inspected. All foreign material and dirt shal1 be removed.
3.7.9 All normal operations preparatory to start-up shall be completed. These are to include :
Checking of all motors, pumps and compressors for alignment, rotation and vibration.
Washing of all lines, which normally contain liquid.
Checking of installation of pump strainers.
Stroking of all motor valves, checking of safety controls, of set pressures and operation of relief valves.
Commissioning and zeroing of instrument, checking of controller action and checking of emergency shutdown system.
Checking to see that all valves and control valves are correctly positioned.
3.8 AIR DRYING
Once a system is mechanically complete i.e. the unit is boxed up with all vessels internals installed (after water flushing is complete), all pre-commissioning check have been carried out and all blinds swung to their correct positions, drying with air then purging with Nitrogen or an inert gas can take place prior to pressurising with process gas.
The units should be prepared for in the following order
Air-drying
Leak testing
Purging the unit with inert gas
Flare system
AIR DRYING KEROSENE RECOVERY UNIT
D) NAPHTHA COLUMN TRAIN
1. Dry all the lines from the B/L to the surge drum 90-V-901.
Note: - The equipment will be deemed to be dry when the air venting from the system at all points is within 10% of the relevant atmospheric humidity for that time. All dead end lines must be checked for dryness during the drying programme.
2. When the surge drum is dry, open and dry the lines.
3. The 2" drain and 2" vent on the surge drum (90-V-901) may now be closed.
4. Open the block valve; purge the lines to the block valve until dry.
5. When the above system is dry, close 90-PV-1201B.
6. Open the 3/4" drain in line to column 90-C-901 and purge until dry. When dry, close again.
7. Open 90-PV-1101 and FV-1102 on manual and both block valves of each C. V. open 90-C-901 top vents and bottom drain.
Note: - Additional air hoses from the plant air system might have to be connected to 90-C-901 to give additional air velocity. Care must be taken so that the trays in the column are not disturbed.
8. Close all other drain and vents in the unit so as to have maximum velocity of drying air passing to the Naphtha Column.
9. Open the 2" drain on the line from the column to the heater reboiler. Purge until dry.
10. Open the 4" line from the column to the cooler E-901 & E-902 bypass. Purge until dry. Open bypass and through line of 90-E-902 open LV-1102 and purge line to Kerosene Storage and line to 90-E-905.
11. Open the suction and discharge valves on both reflux and transfer Pumps 90P 901 A/B and 90 P 902 A/B. Open both minimum flow lines. Open casing drain on Pumps. Purge until dry.
12. Open the upstream block valve of 90-H-901. Open FV-1201 & 1202 and purge until dry. Open the line to the Column and purge it too.
13. Open the outlet block valve of 90-H-901. Close the upstream block valve. Open manually and purge until dry.
14. Close the downstream block valve. Close 90-FV-1201, 1202. Close 3/4" drain.
15. When the column is dry. Open the drains and vents on 90-V-901. Close the drains and vents on 90-C-901 Open all drains at B/L.
16. Open 30" line to air condensers 90-E-903 and the respective inlet and outlet isolation valves of all the tube bundles.
17. Allow air to pass through vessel 90-V-902. Open 2" drain line P-90-1135 2" vent and 2" flare line 90-1103 by opening 90-PV-1102 Al/Bl and A2/B2. Purge vent until dry.
18. Open 90-E-903 suction line to pumps 90-P-902A/B. Open pump drains, vents until dry.
19. Open pump discharge line, minimum flow line to vessel V-902.
20. Open LV-1103, its bypass valves and block valves and purge line ARN to storage and line 6"-P-90-1337 ARN from C-902.
AIR DRYING KEROSENE COLUMN
11. Open SDV to Kerosene column and FIC air purge 90- V-906.
12. Open 2" vent & drain of 90-V-906.
13. Open PV to column C -902 and open FV to E-9I 0 and to column and purge.
14. Open column 90-C-902 bottom drain and top vent. Purge air until dry.
15. Open bypass valve ARN trim cooler and through coolers and pump air to 90-V-903 kerosene reflux drum. Purge the drum. Open bottom drain line 2" to OWS /CBD and pump P-904. Open the minimum flow line to V-903 and purge.
16. Open pump discharge line to 90-C-902 by opening FIC-1304 and its bypass valve and purge dry the lines. Purge the discharge line of pumps 90-P-906 A/B with inert gas. Energise the pump motors.
17. Open the LV -1302 to storage to ARN/Storage to Kerosene and purge dry this line. Open the bypass valve of this.
18. Open column bottom to pump suction of 90-P-903A/B and 6"- P-90-1336 line to Naphtha column bottom pump. Then open LV-1301 and its bypass, pump discharge block valve and kerosene trim cooler 90-E-907 and. purge up to bottom to storage of HC B/L unit area.
19. Open PV-1308 A1, B1 & A2, B2 to flare and fuel gas at the respective B/L units and surge drum.
20. From 90-C-901 dry all lines to their extremes unit the air venting from all parts is within 10% of the relevant humidity for that time.
3.9 START-UP CHECK LIST
A) Before admitting to process gas to any section of the unit or proceeding with other start-up operation, the following checks must be carried out.
Check that system is properly boxed up with all safety valves are in place.
Check that all vessel internals are fixed in position as per design.
Check that all valves, instrument, sample points have properly accessed for operation and maintenance.
Check that there is no hindrance for removal of valves, gaskets, instruments (control valve installation to be check so that such things as pipe support do not make servicing difficult.
Check the drain points are so located that entire liquid can be drained.
Check that all globe valves, orifice plate have correct flow direction.
Check that there is a correct location of steam condensate pots in relation to corresponding heat exchanger.
Check that sewer system is ready to use.
Check that all Electrical lockouts are identified by tags.
Check that all instrumentation and control systems are linked.
E) After the system is reported to be ready for operation in the respect of process, mechanical, electrical, instrumentation and control performance by the respective supervisors follows the check list as given under:
Check that all motors, Pumps and Air coolers are tested for alignment, rotation and vibration and are operational.
Check that all lines are completed.
Check to see the installation of Pump strainers.
Check that stroking of all Motor valves, checking of safety controls, checking of set pressures and operation of relief valves is completed.
Check the commissioning and zeroing of instruments, checking of controller action and checking of emergency shutdown system is completed.
Check to see that all valves and control valves are correctly positioned.
Check to see that all control valves have the correct air failure action, AFC or AFO. Check that other facilities, which are not in a position to start-up, are isolated by blinds from this unit.
Check that all instruments have been calibrated and checked seal pots filled.
Check that all necessary government approvals are obtained.
Check the emergency shutdown systems are operational.
Check that all safety valves are in position after testing. The isolation valves for the online safety valves will be in the locked open position. The spare valves are isolated.
Check that all blinds are in correct position.
Check that the flare is operational and its purge gas is inline.
F) OTHER CHECKS
Check that communication system is ready within plant and plant to control room.
Check that all necessary tools and tackles for tightening /loosening of bolts etc. are available to carry out online maintenance or standby maintenance.
GENERAL INSTRUCTIONS
Have an open vent at the top of the equipment during fill- up or draining.
During the pressure test, use of foaming products to check for leakage around the flanges.
Check the valve and pump packings.
3.10 STARTUP PROCEDURES
INTRODUCTION
In this section under operating procedures, start-up procedures are discussed. Emergency procedures are also covered in this section. The most critical periods in operation are those of start-up and shutdown. It is then, that the hazardous possibilities of fire and explosions are the greatest.
3.9.3 STARTUP PREPARATIONS
The summary or start-up procedures is as follows:
The entire system is purged with inert gas to free the system of air to less than 0.5% oxygen. Blow down system is lined up the flare and the flare header is connected to the flare tower. After displacing air, fuel gas/feed gas is taken for system drying.
Pressurising of the system will be done step wise with fuel gas and at each step of pressure rise leak checking will be carried out. Final leak check will be with fuel gas pressure up to 5 Kg / cm2g.
The various steps lending to safe and smooth start-up of the KRU unit are as follows:
a) Purging the unit with inert gas.
b) Commissioning KRU flare header closed/ blow down system.
c) Commissioning of fuel gas system.
d) System drying with fuel gas.
e) Commissioning of Naphtha column/Kerosene column.
f) Normalising the unit.
3.9.4 PRE START-UP PROCEDURES
A) PURGING THE UNIT
The entire system including the fuel gas, flare, blow down system is to be freed of air to less than 0.5% oxygen before taking in fuel gas or feed gas for drying. For purging the plant with inert gas, nitrogen produced by the inert, gas generator and supplied to the unit through inert gas header be used. Inert gas connections shall be done at various utilities connection point, drain and vents of equipment and piping to purge the system.
For purging, the unit may be divided into various systems. Purging is accomplished by depressurising to 0.5 kg/cm2G. When pressurising the system for purging care must be taken so as not to exceed the design pressure of the system under purge. After purging, the system shall be kept pressurised under a positive pressure to avoid ingress of air.
B) COMMISSIONING OF THE FLARE HEADER
After the system has been inertised and oxygen level ensured to be less than 0.5 % in flare header and blow down system, the 30" flare header from flare KO drum is integrated with the 48" flare header of Hazira Plant.
Care must be taken to equalise the pressure in the flare header for Hazira Plant before the 30” valve on flare KO drum (90-V-904) outlet is opened. Establish the, fuel gas purge to flare and blow down headers after commissioning fuel gas system.
C) COMMISSIONING OF FUEL GAS SYSTEM
Fuel gas for starting up the unit is taken through a 3" line from the fuel gas line. For commissioning of Fuel gas system, proceed as follows:
The system is already inertised and is under a slight positive pressure of Nitrogen.
Line up the system as follows:
Fuel gas header 4" -FG-90-140 l-A 1 –AII flare header 2" -FG-90-1402-A l-A-II, FG to H-901, 902 by opening 3"-FG lines to each of them.
Check all instruments and safety valves are in line.
Check steam tracing on the fuel gas line is commissioned.
3.10 LEAK TESTING
1) Examine if any temporary, blinds required to be removed which were fitted during construction and hydrostatic testing especially under safety valves. If such blinds are found, remove them.
2) Examine if all Orifice plates have been installed.
3) Close all vents and drains.
After the above general checks plant is required to be closed completely as if it is a single chamber which can be pressurised totally (i.e. all pipe work, vessels and associated' equipments) even with a single entry point for a pressurising gas.
Please proceed as follows:
Pressurise the unit with plant air gradually up to 5 kg/Cm2 or the maximum, which can be reached using plant air (please note that the test pressure must not exceed design pressure of any pipe, vessel, associated equipment). Approval of Engineer-in- charge on the test pressure to be applied for leak testing has to be obtained before pressurising the unit.
All flanges and connections must be tested for leaks using soap solution and brush. To detect small leaks tape the joints and then puncture the tape. Test the puncture with the soap solution.
For the sake of carrying out such leakage test insulation should not be put on the joints/flanges etc.
After leak checking/leak repair/ inspection certification, depressurise the unit.
3.11 PURGING WITH INERT GAS
Check the unit carefully prior to purging for temporary blinds installed during construction and hydrostatic testing, especially under safety valves. If there are any remaining, remove them. See that all orifice plates have been installed and close all drains and vents. Using steam or inert gas, proceed to purge the oxygen from all equipment as described below.
Oxygen must be removed from the process pipe work, vessels and associated equipment before the introduction of process gas and hydrocarbon liquid into the unit.
3.11.1 KEREOSENE RECOVERY UNIT
1) Turn to the closed position all process spectacle blinds at the B.L.
2) Turn to the open position all spectacle blinds that isolate one piece of equipment from another.
3) Open all Control valves, and block valves so that the entire system can be intertised up to the RL.
4) Utilizing the inert gas connections on the pump suctions, pressurize the system to 4.0 Kg/cm2a.
NOTE: If required connect inert gas hoses from the utility stations to the Naphtha and kerosene columns.
5) When the system pressure attains 4.0 Kg/cm2a.
6) Depressurise the systems at the extremes of the unit.
7) Re-pressurise the system to 4.0 Kg/cm2a with inert gas.
8) Depressurise the system at the extremes of the unit at the vessels exchanges and pumps.
9) Re-pressurise the system to 4.0 Kg/cm2a with inert gas.
10) Depressurise the system at high point vents and low points drains.
11) Re-pressurise the system to 4.0 Kg/cm2a, with inert gas.
12) Check with portable analyzer the O2 content of the nitrogen / inert gas in the system. 0.5% O2 is the maximum al1owable content in the nitrogen/ IG atmosphere within the process equipment.
13) Start to cheek at nearest point of N2 entry, check every vent and drain on pipe work, vessels, columns, exchangers and pumps etc. for O2 content of the inert gas venting, from each point.
14) Progress through the unit until 100% of the inert gas has an O2 content less then 0.5%.
15) If the O2 content is above 0.5% open that particular drain/vent and purge out inert gas until the gas has O2 content less then 0.5%.
16) If the O2 content is continues to be above 0.5%, depressurise the unit and re-pressurise to 4.0Kg/Cm2a with inert gas.
17) Continue to check through the unit until it is O2 free.
18) Repeat the above items as required until the inertisation has been satisfactorily completed.
19) Leave the unit under positive inert gas pressure after inertising so that air cannot enter the equipment.
3.11.2 FLARE SYSTEM
Flare header to be cleaned by gasket bursting with plant air before purging with inert gas. Close all vents and drains and install a pressure gauge, gasket and plates at the end of flare header.
Pressurise the flare header with plant air system pressure. Then burst the gasket to blowout the all foreign materials such as debris, welding slag and etc.
Repeat the above procedures until the flare is cleaned. Then purge with inert gas as following procedures.
7) Turn to the closed position all the spectacle blinds on the flare systems and lines leading into the system.
8) Close all other valves.
9) Open 2" vent valve on the flare K.O. drum 90- V-904.
10) Connect a Nitrogen/inert gas hose to the extreme end of the flare system
NOTE: - It will be necessary to connect hoses at more than one point to ensure that the system is O2 free.
11) Purge with nitrogen gas to the flare KO. drum.
12) With the portable analyser check the O2 content in the inert gas flow at all high point vents and drains. If the O2 is less than 0.5 vol % the flare can be judged to be O2 free.
PART – IV
4.0 PLANT START-UP
4.1 INTRODUCTION AND INITIAL START-UP
4.2 NORMAL START-UP
4.1 INTRODUCTION & INITIAL START-UP AFTER COMMISSIONING
GENERAL
The Kerosene recovery unit operates in conjunction with the condensate fractionating unit. In case of a start-up, ascertain that all preparations outlined previously have been completed and that all utilities are available in adequate supply, and that the fire water system is operating.
It is assumed that all pre-commissioning work outlined in section III have been completed i.e. Kerosene Recovery Unit system has been cleaned, purged free of Oxygen with inert gas, blanketed with inert gas, leak test, Heater & Air coolers systems have been completed and is ready for start-up.
Line up the unit to be started. Check that all vents and drains are closed. Check again that all temporary blinds installed for hydro testing or pre-comnissioning have been removed. Check that all spectacle blinds at B/L especially in flare lines are in open position. All MOV's and SDV's to be closed, all control valves to be in manual mode in closed position.
Ensure that an adequate supply of feedstock is available before attempting to start-up the unit.
INTRODUCTION OF FUEL GAS AND NGL LIQUID
Now it is ready for initial start-up according to the previously described procedures. Prior to taking NGL to the system, it should be pressurised and LP leak tested with sweet gas as per the following procedures.
l) Turn all spectacle blinds to correct position for normal operation.
NOTE: When turning the spectacle blinds, allow a small amount of inert gas from the flange so as to prevent air from entering the equipment. If necessary, bleed a small amount of inert gas into the equipment.
2) Close emergency shutdown valve 90-SDV-1101 & 90-SDV-1501 by operating the bypass switches in the control room.
3) Open the upstream and downstream block valves on 90-PV-1106 A/B and SDV-1501. Put 90-PIC-ll06 in manual control and close it.
4) Open the FG Isolation Valve on 2"-FG-90-1101 and PV-1102 A,B. Slowly pressurise up the unit from gas line and the surge drum 90-V-901 by operating the globe valve on the pressurising line.
With LP fuel gas, do the leak test of the entire system. Unit will be categorized in to three sections with operating pressure (refer to attached P & ID 2759-02-90-111)
A) NGL FEED SECTION
B) NGL FRACTIONATION SECTION
C) KEROSENE / ARN RECOVERY SECTION
5) Slowly pressurize the entire system from pressurizing line (2"-FG-901101) to Naphtha column and surge drum to 1.0 kg/cm2 with fuel gas. Then close the globe / block valve on the pressurising line and block valve at B/L and do leak test with soap solution.
6) If entire system is tight enough, close the block valves on/downstream of 90-FV-1202 and block valves on 2"-P-90-1211-2 tightly.
7) Pressurise the NGL feed and kerosene fractionation sections of train #2 to 1.0kg/cm2 using globe valve on the pressurising line on Kerosene reflux drum and then close the globe valve and B/L block valve. Recheck the tightness of NGL feed section and NGL fractionation section. After confirmation of tightness of the above system, close the block valves. Also the column 90-C-901 and 902 to be pressurised and leak tested. The column bottom circuit to furnace and return is also to be checked for leakage.
8) Close the block/globe valve on fuel gas line and block valve at B/L.
9) Carryout the leakage test at the reflux drum of NGL and Kerosene. All flanges and connections must be tested for leaks using soap solution and brush. To detect small leaks, tape joints and then puncture the tape. Test the puncture with soap solution. Check system pressure, if the system pressure loss is within 2 kg/cm2/hr, the system is tight.
10) NGL receiving system is now ready to receive the NGL.
INTRODUCTION OF CONDENSATE
Close 90-PV-1106/FV-11 02 on manual control.
Activate the emergency start-up switch provided to bypass the shut down of 90-SDV-1101 and limit-switch closure on.
Open SDV-1101. Put 90-PV-1101 on manual to control the pressure of the surge drum.
Very slowly open the main isolation valve in the NGL input header line until it is fully open.
Put 90-PV-1106 on manual control and manipulate it to very slowly establish a 50% level in the surge drum 90-V-901.
When a 50% level is obtained in 90-V-901 put 90-FV-1102 and 90-LlC-1101 on to automatic control with the set point at 50%.
Open the up-stream and down stream block valves of 90-PV-1102 A1,B1 open the bypass valves on above and open block valves of PV-1102 A2, B2.
Open the fuel gas line 2"-FG-90-1101 to the reflux drum 90-V-902 and slowly open PV –1102 A,B to pressurise 90-V-902 and 90-C-901.
Open block valves on upstream of air cooler 90-E-903 and allow gas to 90-C-901.
When the pressure in the reflux drum reaches 1.4 kg/cm2a close the fuel gas line PV-1102 A/B and set the PIC set point to 1.4 kg/cm2a and put it on auto mode. Close the bypass around 90-PV-1102 A/B.
Now put the 90PV-1102 A2,B2 on auto after setting the pressure of PIC 1102 to 1.4 kg/cm2.
Open the inlet and outlet cooling water valves on the trim coolers.
Open the suction valves on both Naphtha columns bottom transfer pumps and prime the pump casings.
Continue taking NGL in 90-V-901 and also take NGL into column 90-C 901 till 50% level is seen in LT-1102.
Start the column bottom transfer pump 90-P-901 A/B and establish a minimum flow circulation through 90-RO-1101 back to Naphtha column 90-C-901.
Slowly open the discharge valve on the Naphtha column transfer pump 90-P 901 A/B and establish a flow to the heater furnace 90-H-901.
Open the block valve of heater of 90-FV-1201, 1202.
Slowly open the FVs 1201,1202 manually and establish NGL flow through the pipes of heater and flow of NGL to column 90-C-901 and maintain level of 50% in LT-1102 of 90-C-901.
Continue to feed the Naphtha column until a 50% level is established at the base as per LT.
Leave 90-FV-1201,1202 on manual control and leave it in that position.
Start all the air cooler fans of 90-E-903.
Check the pilot burners and open block valves of pilot burners and PCV 1201 and open the same and light up the pilot burner of 90-H-901.
Open the block valve SDV-1201 and FV-1203 (fuel gas to main burners of 90-H-901).
Slowly open FV-1203 and light up main burners, keep a close watch on the outlet temperature of the NGL, liquid/vapour from H-901 to 90-C901 as, the temperature will start rising slowly.
Open the SDV-1501 to the Kerosene column and take feed slowly into the Kerosene column surge drum 90-V-906, by slowly opening LV-1501 (after opening its block valve).
Open block valve of PV-1501 and keep PV-1501 closed on manual. Slowly manipulate PV-1501 to get about 50% level in the surge drum 90-V-906.
Once 50% level is obtained in 90-V-906 put 90-FV-1503 to Kerosene column on auto control to 50% level.
Open the upstream and downstream block valves of 90-PV-1308 A1, B1 and 90-PV-1308 A2, B2.
Slowly open the fuel gas to 90-V-903 through 90-PV-1308 A1,B1 on manual and pressurise the column 90-C-902.
Once reflux drum/column pressures are 1.4 / 1. 7 kg/cm2 put PV-1308 A1, B1 on auto by keeping set point of PIC 1308 A1, Bl at 1.7 kg/cm2.
Also put PV-1308-A2B2 on auto mode keeping set point at 2.0 kg/cm2.
Take about 50% level in the Kerosene column.
Start both the Air cooler fans of 90-E-906 and continue operation.
Open the suction block valves on both kerosene column Pumps 90-P-907 A/B.
Prime the pump casings by opening both minimum flow lines.
Start 90-P-907 A and establish a minimum flow back to the Kerosene column 90-C-902 via 90-RO-1303 in the line 1.5"-P- 90-1516-A1A-IH.
Light up the pilots of 90-H-902 by opening isolation valves of 90-PCV 1301.
Open the isolation valve of 90-FV-1303 and keep FV-1303 on manual mode.
Open the SDV-1301 (by reset) and open FY-1303 on manual to light up the main burners.
Slowly raise the Naphtha column bottom temperature by increasing the flow of the fuel gas to the heater via 90-FV-1201, until it stabilises at 298 oC.
Open upstream and down stream block valves on 90-FV-1303 and 90-PCV-1307 and establish a flow of fuel gas to kerosene heater 90-H-902.
Increase the fuel gas flow to the Kerosene column heater 90-H-902 to increase the furnace outlet temperature and the temperature at kerosene column inlet from heater to 298 oC.
Adjust 90-LV-1302 to maintain the desired bottom level in the Kerosene column 90-C-902.
When a level begins to appear in the kerosene column reflux drum 90-V903 open the suction block valves to both reflux/transfer pumps 90-P904 A/B. Prime both pump casings. Open the minimum flow lines.
Start 90-P-904 A and establish a flow through the minimum flow line back into the reflux drum 90-V-903 via 90-RO-302.
Open upstream and downstream block valves on 90-FV-1304 open 90-P-904A discharge valves.
Establish a small flow through the reflux controller 90-FIC-1304. Try to maintain the level in the reflux drum, during this warm-up period.
When the Naphtha column 90-C-901 and the Kerosene column 90-C-902 are on the following conditions.
Start increasing the feed rate in steps to the Naphtha column 90-C-901 until the total feed is equal to the NGL flow entering the KRU unit.
Open the block valves in the line from the base of the Kerosene column 90-C-902 to Kerosene cooler 90-E-910 and 90-E-911 A/B, line number 3" -P-90-1510-B1A.
Open the upstream and downstream block valves on 90-LV-1301A. When the bottom level starts increasing in 90-C-902. Send the Kerosene product to storage via 90-LV-1301 A.90-E-910 and 90-E-911 A/B.
As the level starts increasing in the kerosene/ARN reflux drum 90-V-903. increase the reflux ratio(depending on the operating case).
As the level in the ARN reflux drum 90- V-903 continues to increase, open the upstream and downstream block valves on 90-LV-1302.
Place 90-LlC-1302 on automatic control and set at the desired level. As the level continues to increase 90-LlC-1302 will open and send ARN product to storage tanks.
Take samples of the ARN product and the natural gasoline product.
Fine tune the unit to give the product specification.
4.0 NORMAL START-UP
4.2.1 GENERAL
During the course of operation of the plant, it will be necessary to start-up all or portions of the plant after shutting down for various reasons. After each maintenance turn-around, the plant will have to be brought up from a depressurized, ambient temperature state. Portions of the plant will have to be restarted after a shutdown due to a mechanical malfunction or an operating problem. None of these reasons will dictate as time consuming an operation as an initial start-up experience should enable the operators to carry out a number of the previously described individual start-up steps simultaneously.
The following normal start up sequence is recommended with the understanding that the judgment of the operators should dictate which of these steps are required and in what order on the nature of the preceding shut down. The initial start up instructions previously described should be referred to for specific details.
4.2.2 After any emergency or other shutdown, the foreman and the supervising operator in charge, prior to initiating start-up order, shall personally check the unit to ensure that the unit is ready and safe to operate.
The Supervisor shall be responsible for ensuring that adequate experienced operators and craft coverage is provided for the start-up.
The supervising operator in charge shall be responsible for ensuring that:
The operations outlined in this instruction are performed properly.
The safety regulations are observed at all times.
START-UP PROCEDURES (SERIES MODE)
In these procedures, it has been assumed that, the plant has been shutdown for a short duration to allow maintenance on an equipment item or because of an interruption to the feed supply.
The unit at this stage is assumed to have been fully pre-commissioned of necessary in accordance with pre-commissioning instructions, has been purged of air and re-pressurised to normal operating conditions.
It is assumed that all the utility systems have been fully commissioned and is available to the unit. All instructions have been checked and are ready to function in the automatic mode.
All piping and equipment in the unit should be lined up and internal block valves and isolation valves should be opened as necessary.
In this stage pressurising gas may be made available for the inert gas header. Re-pressurise the surge drum 90-V-901 with inert gas to the NGL header pressure.
Commission the inert gas/flashed gas feed loops and NGL feed loops then set PV-1106 at 2 kg/cm2 below the NGL arrival pressure.
Slowly establish a flow to surge drum 90-V-901 by operating 90SDV-1101 start-up trip bypass with open valves.
Put 90-PV-1106 on manual control and slowly manipulate to establish a flow of condensate to the surge drums.
Check supply of fuel gas to heaters 90-H-901, 902.
Start 90-P-901 A/B when a level is established in 90-V-901.
Establish a flow through 90-FV-1102 to the Naphtha column 90-C-901.
Establish a level in the bottom of 90-C-901 via 90-H-901.
Commission fuel gas to 90-H-901 and slowly raise the fuel gas quantity to the heater.
Start the reflux pump 90-P-902 A/B and establish reflux flow to give a top temperature of 113.5 °C.
Slowly raise the temperature of H-901 outlet to bring C-901 bottom temperature to 200 oC. During this period C-901- H-901 -C 901 flow will continue and no feed will be sent to H-902.
Commission cooling water to trim coolers of ARN and Kerosene.
Once the C-901 bottom temperature of 200 oC is achieved, open FIC-1301 and establish flow to H-902.
Establish a level in 90-C-902 base.
Commission fuel gas to heater 90-H-902 and slowly increase fuel gas to the heater.
Raise the temperature and pressure to normal conditions and set to give on automatic control.
Send samples for final analysis and fine tune the unit to give specification product. Till the products are on specification send SKO and HSD to NGL tank by using the off spec line.
When the products are on specification, divert SKO and HSD to the respective storage tanks. Start increasing the feed stepwise by adjusting the unit flow until it corresponds with the amount of NGL entering the KRU.
PART – V
5.0 OPERATING PARAMETERS
5.1 GENERAL
5.2 OPERATING CONTROL PARAMETERS
5.3 ADJUSTMENT OF OPERATING PARAMETERS
5.4 TABLE OF NORMAL OPERATING PARAMETERS
5.1 GENERAL
Any changes in the operation of the field trading units will directly affect the operation of the plant.
Likewise, changes in the different units within the plant will manually affect the other unit and ultimately required offsetting adjustments. Other changes which affects the plant are required adjustment are the effects of seasonal changes, ambient temperatures, the changes caused by the intensity of the sun's rays and the effect of the wind. These causes temperature to vary, resulting in changes in stream densities and viscosities. Tower operation often displayed cyclical effects due to day versus night temperature changes.
All of these require adjustments in operation in order to produce products of a constant specification. However, too frequent operational adjustment or extremely large corrections are undesirable as they will cause upsets which, in turn, will not allow operations to stabilize.
Change pressures and temperatures carefully and deliberately to avoid equipment damage and operational upsets. Make small changes incrementally to avoid over controlling or oscillating around control points. Always employ elaborate precautions to avoid air - hydrocarbons mixtures in explosive ranges.
Confirm that the flare system is in continuous operation to protect the plant by providing a rapid means of disposal of flammable materials at all times.
Assign routine maintenance and lubrication schedules to all driven equipments as soon as they begin operations. Regular inspections, lubricating schedules and preventive maintenance are proven procedures for achieving peak operating efficiency and long trouble free runs. Inspect all units at frequent intervals and check the level in all vessels requiring level.
Watch the operation of level controllers, particularly during periods when changing temperatures ,foaming or other condition exists that could upset the unit. Normally, temperatures are the most dependable data in the plant. However, thermocouple calibrations are subjected to drift. Therefore, before making drastic changes based on what may be incorrectly reported temperatures, check the locally mounted temperature indicators.
The same reasoning applies to samples and their analysis. If a sample analysis appears to vary widely from the previous results, while all other data remaining reasonably constant, obtain a new sample before changing the operation.
Always secure good representative samples using proper procedures and safe practices. Good results depend on good samples.
Regularly inspect operating exchangers and equipment for deviation from normal, the condition of safety valves, and pressure, level or flow regulating equipment. Pressure and temperature variations are reflected in products compositions and affect the achieving of product specifications.
Maintain a complete log and establish a regular sampling schedule. A smooth operation of the plant requires that all units within the plant be under control at all times. Alert understanding of all operations and the effects and relationship of one unit to the other is necessary to accomplish this. A careful surveillance of all control points, temperatures and pressures along with regular inspection of all sections of the several units are essential for successful operation of the plant.
5.2 OPERATING CONTROL PARAMETERS
In the normal operation following parameters should be regularly inspected:
a) Parameters subject to fast change:
NGL rate to the KRU unit in case of change in amounts of liquid entering the CFUs.
Pressure drop in the Naphtha and Kerosene column.
Temperature increase in heater.
Temperature increase in air cooled condensers.
b) Parameters subject to slow changes:
Pressure drop through heaters and air cooled condensers.
Change in hydrocarbon components in feed NGL.
1) NGL feed rate change to the unit.
Amount of NGL may vary in KRU while LPG column is destabilized or change of upstream of LPG column operating pressures. In this case, outlet temperature of the surge drum 90- V-901 pressure and liquid level of surge drum will be varied and subsequently affect the downstream of surge drum. Operator should react properly but do not make change in one step.
2) Pressure drop in the Naphtha and Kerosene Column:
Pressure drop across the Naphtha and Kerosene Column can vary with feed liquid flow and heater duty. But sudden change of pressure drop is sign of trouble. Increasing of pressure drop without significant change of process condition is the sign of flooding of tray. Flooding will occur when tray is plugged or vapour flow rate is much higher than liquid flow rate. So check the operating conditions compare to design condition and adjust a process condition. Little increase of pressure drop will not affect the product quantity but significant change of pressure drop may affect the product quality. If the pressure drop increases rather than normal ,reduce the feed rate to Naphtha and Kerosene column and stabilize the process condition watching over the product quality.
3) Temperature increase in the heater
4) Temperature increase in air cooled condenser.
5.3 ADJUSTMENT OF OPERATING PARAMETERS
Although operating parameters in general are set near to calculated conditions, following points have to be kept under careful observation and control.
Too frequent operational adjustments or extremely large corrections are undesirable as they will cause upset, which in turn ,allow operation to destabilize.
Make small changes incrementally to avoid over controlling or oscillating around control points.
Always employ elaborate precautions to avoid air hydrocarbon mixture in explosive ranges. Ensure that flare systems are it continuous operation to protect the plant by providing a rapid means of disposal of flammable materials at all times.
Assign routine maintenance and lubrication schedule to all driven equipment as soon as they begin operation. Regular inspections, lubricating schedule and preventive maintenance are proven procedures for achieving peak operating efficiency and long trouble free runs.
Inspect all units at frequent intervals and check the levels in all vessels. While the operation of the level controllers particularly during periods when changing temperature, foaming or other conditions exists that could upset the unit.
Normally temperatures arc most dependable data in the plant. However, thermocouple calibrations are subject to drift. Therefore before making drastic changes, check the local mounted temperature indicators.
NGL RECEIVING SYSTEMS
The receiving system is designed to receive NGL from the CFU at pressures between 8.3 kg/cm2 to 10 kg/cm2 and temperature of 170 oC to 185 oC . Pressure conditions exceeding these limit would obviously mean undesirable situation in the respect of equipment design, as well as process. With in the above limit the plant has to be kept in stable running condition by way of adjustments.
NAPHTHA COLUMN C-901
Column pressure will be maintained by PV-1102 A1,B1 and PV-1102 A2, B2.
ARN product specification is to be controlled by adjusting the column bottom temperature and /or by changing the reflux.
KEROSENE COLUMN 90-C-902
The column pressure will be maintained at 0.5 kg/cm2 by the use of PV-1308-A1,B1) and A2,B2.
Kerosene product specification is to be controlled by adjusting the column bottom temperature and /or by changing the reflux.

PART – VI
6.0 PLANT SHUTDOWN PROCEDURES
6.1 GENERAL
6.2 PLANT SHUTDOWN (SHORT DURATION)
6.3 PLANT SHUTDOWN (LONG DURATION)
6.4 EMERGENCY SHUTDOWN
6.0 PLANT SHUTDOWN PROCEDURES
6.1 GENERAL
A planned shutdown is a non-emergency shutdown such as annual shut down.
As Kerosene Recovery Unit is connected with other upstream CFU, the process supervisors of these units should be informed before taking any scheduled shutdown.
During a shutdown all equipment isolation valves should be closed to minimize the release of hydrocarbons.
Two types of normal shutdown (short duration and long duration) and purging procedures are presented in this chapter. The major difference between the two types of normal shutdown is that for the long duration shutdown, it is recommended that all the equipments be completely drained and purged.
6.2 PLANT SHUTDOWN (SHORT DURATION)
On a normal shutdown the feed to the unit should be slowly reduced in a stepwise manner to minimize disturbances to the upstream process units and utility systems. For shutdowns of a very short nature, i.e. less than a shift, consideration should be given to blocking in the unit and storing the NGL in NGL tanks.
1. Slowly reduce the NGL feed to 40% design in steps of 5% of design flow.
2. When the unit has been reduced to 40% of design flow start reducing the temperature of columns 90-C-901/902.This is done by reducing fuel gas to Naphtha heater 90-H-901 and flow to Kerosene column heater 90-H-902.
3. Circulation of C901 –H 901 – C 901 may be continued till C901 bottom temperature comes down to 150 oC.
4. Close the Naphtha column 90-C-901 feed by closing the PV-1106 and SDV 1101 and maintaining the level in 90-V-901 close FV-1102 and PV-1101 slowly to totally stop feed to Naphtha column.
5. Stop furnaces H-901 & H-902.
6. Close the block valve on 90-P-901 A/B.
7. Stop the pumps 90-P-901 A/B.
8. Close block valves at the B/L of ARN, Kerosene & HCR/HSD products
9. Keep the Naphtha and Kerosene column reflux/transfer pumps 90-P-902 A/B and 90-P-904 A/B on circulation until column bottom has cooled down and level in reflux drums are at 20%.
10. Close shutdown valve.
11. When the level in associated vessels have stabilized at 50%, block in the following control valves.
12. Stop the Naphtha / Kerosene column reflux pumps 90-P-902 A/B, 90-P-904 A/B when level in V-902 & V-903 has reduced to 20 %.
NOTE: Careful watch on all pressures, temperatures, levels and rotating equipments during this period is required. Make necessary adjustments so that restart can progress safely without too much delay.
6.3 PLANT SHUTDOWN (LONG DURATION)
For planned long duration shutdown, plant would be stopped as per procedure outlined for short duration.
Further all the lines from CFU should be drained of liquid hydrocarbons and the plant depressurized to flare or CBD before inertising all the equipments.
1. Keep Naphtha and Kerosene Column 90-C-901, 902 column pressure at 0.5 kg/cm2 by adjusting the inert gas flow to V-902, V-903.
2. Slowly reduce the pressure of NGL surge drum 90-V-901 to 2.5 kg/cm2.
3. Start 90-P-901 A/B and pump out NGL from 90-C-901 until just before it cavitates.
4. Slowly transfer the liquid level in the surge drum to Naphtha column 90-C-901 via. FV-1102 by-pass line and totally empty out 90- V -901.
NOTE: Watch carefully when emptying 90-V-901 to prevent gas breakthrough into the column as it could disturb the trays of the stripper and demister pads, if any.
5. Start 90-P-902 A/B to pump ARN level in reflux drum 90-V-902. Stop 90-P-902 A/B just before it starts to cavitate.
6. Transfer the liquid levels from Naphtha column and Kerosene column.
7. Shut off the fuel gas supply to H-901/902, when temperatures have come to minimum.
8. Depressurize the entire unit to the flare system.
9. Drain any liquid levels to CBD system after checking that the system is completely depressurized.
10. Open the inert gas valve and purge out with inert gas.
11. Close all the drains and flare system.
12. Open block valves on inert gas connection line to vessels/columns and connect the inert gas to vessels from the hose stations. Purge out hydrocarbons from the unit.
13. Pressurize the entire unit up to 2 kg/cm2 with Nitrogen inert gas.
14. Depressurize the entire unit to flare system through all vent connections.
15. De-pressurise the unit up to 0.1 kg/cm2 g. Repeat the steps 14, 15 more than three times until hydrocarbon content is below 0.5 vol.%. Check and ensure that hydrocarbon content is below 0.5 vol.% through the unit with a portable analyzer. Leave a pressure of 0.4 to 0.7 kg/cm2 g on the unit at the time final depressurizing is done. If hydrocarbon content is above 0.5 vol. % depressurize to 0.1 kg/cm2 g and repeat steps until hydrocarbon content is less than 0.5 vol. %. Check Hydrocarbon content in dead ends of pipes and ensure that hydrocarbon in liquid is blown through. Any hydrocarbon condensate accumulated in the vessel should be drained to the OWS.
16. Close all connections to the flare, when all lines and equipments have been inertised.
17. Turn the spectacle blinds at unit B/L to their closed position. The Kerosene Recovery Unit, except flare and blow down system are now completely isolated and are ready for maintenance and inspection. The equipment and lines shall not be entered without proper oxygen apparatus unless the unit has been purged entirely with air to displace all inert gas.
18. Open block valves in the vapour line and purge until dry. Then dry and close again.
19. Open the vent valve on the line above and then purge until dry. Open the minimum flow lines and discharge lines on both pumps. Purge via the pump minimum flow line (reverse flow) and purge until dry.
20. Open the inlet block valve, the vent and drain on E-902/E-910 close the vent and drain and purge until dry.
21. Open both suction valves on pumps. Open pump casing drains, purge until dry, when dry, close again.
22. Open the 3/4" drain on the upstream block valve, close the vent and drain. Purge until dry.
23. Open the downstream block valve on 90-V-901 and open 90-FV-1102 (2"-P-90-1110) into the line to OWS and CBD. Purge both lines until dry.
24. Close the 2" line from the bottom of 90-V-901.
25. Open the suction and discharge valve on both column bottom pumps 90-P-901A/B. Open both minimum flow lines. Open casing drains on both pumps and purge until dry.
Note:- Additional air hoses from the plant air system may have to be connected to 90-C-901 to give additional air velocity. Care must be taken so that the trays and demisters in the column are not disturbed.
6.4 EMERGENCY SHUTDOWN
6.4.1 TYPE OF EMERGENCY SHUTDOWN
Emergencies will generally require an immediate complete stoppage of operation with at least part of the plant shutdown and depressurized. In most instances; hydrocarbon must be eliminated to the maximum extent possible in the shortest time as determined by the urgency of the emergency. In some cases, the type of shutdown is complicated by the emergency situation itself, requiring in many cases a split-second decision by the operator.
Conduct all emergency shutdowns in the most economical way possible with primary consideration for the safety of the personnel, with the secondary concern to safe-guarding the equipment and still priority reserved for products quality. Determine the cause of the emergency including the exact situation; and if possible, revert to a normal shutdown at the first opportunity.
Emergency shutdowns may be caused by :
Automatic shutdown following a programmed sequence and resulting for e.g. from a product/utility failure.
Manual shutdown entailed by an emergency or induced to avoid an accident.
It is difficult to predict all the possible causes of emergency shutdown and to define, for each case, the disposition to be taken.
Recommendations hereafter, are only partial guidelines, the actual shutdown procedures will be defined in function of the actual situation and operator’s trouble shooting capability.
6.4.2 ACTION DURING EMERGENCY SHUTDOWN
1. HIGH LEVEL IN NAPHTHA SURGE DRUM 90-V-901:
The following automatic action will be taken on 90-LSHH-1101 being activated.
· Closes inlet SDV’s 90-SDV-1101
The following manual action should be taken by operator.
Put 90-FIC-1102 Naphtha column on manual mode and open more. Close 90-LV-1102 to maintain level in the Naphtha column 90-C-901. Reduce reflux to 90-C-901 to maintain level in the reflux drum 90-V-902.
If level in 90-C-901 increases to abnormally > 100% then open LV-1102 to draw product and maintain level in column, otherwise keep LV-1102 in normal position.
2. LOW LEVEL IN THE SURGE DRUM 90-V-901:
The following automatic action will take place on 90-LSLL–1101.
· Closes FV-1102
The following manual action should be taken by the operator.
· Stop 90-P-901 A or B .
When level returns to normal condition, following actions should be taken.
· Latch open shutdown valves.
· Put FV-1102 on manual control and feeding in condensate to the surge drum 90-V-901.
· Open fuel gas valves FV-1203, FV-1303 to heater H-901/H-902.
3. HIGH TEMPERATURE OF H-901/H-902 FEED OUTLETS:
90-TSHH-1201/1301 will be activated and following actions will take place automatically.
Close emergency shutdown valve 90-SDV-1201 and 1301 of heaters.
Close FV –1203 / FV-1302.
Trips 90-P-901 A/B.
The following actions should be taken by operator.
Decrease the feed flow to the column 90-C-901 and 902 by closing FV-1102.
Check fuel gas system and the NGL system.
After the problem has been overcome:
Activate the start-up switch located on the panel bypass.
Reset 90-SDV-1201/90-SDV-1301.
Reset FV-1203 /FV-1302 manually.
Supply fuel gas to H-901 /902 .
Slowly start feeding condensate from the column bottoms to the heaters.
4. LOW PRESSURE FUEL GAS TO HEATERS H-901/H-902:
90-PSLL-1201/1301 will be activated and following actions will take place automatically.
Closes 90-SDV-1201 & 90- SDV-1301, FV-1201, FV-1202, FV -1301 & FV 1302 & trips 90-P-901 A/B.
The following actions should be taken by operator:
Reduce feed flow to H-901/902.
Check fuel system.
90-SDV-1201/1301.
Reset manually.
Reset 90-FV-1201, PV-1202 on to manual control and slowly operate.
Bring unit back to normal conditions.
5. LOW LEVEL IN NAPHTHA COLUMN:
90-LSLL-1102 will be activated and the following actions will take place automatically.
Trips 90-P-901 A/B.
Open FV-1102 after checking SDV-1101 and level in V-901.
After establishing about 30 to 50 % level in column C-901. Start the pump after resetting.
6. HIGH PRESSURE IN THE NAPHTHA COLUMN 90-C-901:
Bottom 90-PSHH-1101, Top 90-PSHH-1102, 1103 switches are activated. Closes H-901 (will be activated and automatically closes FD-SDB and trips P-901 A/B.)
The following action will be taken by operator:
Check DP across Naphtha column.
If DP on 90-C-901 high, decrease feed rate.
Check column bottom temperature.
If C-901 temp. is high, check for the flow rate and P-901 A/B also closing SDV –1201, then normalize the steps one by one.
7. LOW LEVEL IN THE KEROSENE COLUMN C- 902 BOTTOM:
90-LSLL-1301 will be activated and 90-P-903 A/B, closes SDV-1302 will be stopped by interlock.
The following actions will be taken by operator :
Increase feed to 90-C-902
Close level control valve LV-1301
8. HIGH PRESSURE IN KEROSENE COLUMN 90-C-902:
In this case 90-PSHH-1302/1303 will be actuated by inter lock.
The following actions should be taken by operator :
Check column overhead pressure
Check DP across the column 90-C-902
Check column bottom temp
Check overhead temp
Check reflux pump 90-P-904 A/B
Check reflux control Valve 90-FV-1304
6.4.3 EMERGENCY PROCEDURES
6.4.3.1 GENERAL
When the safe routine pattern of normal operation is interrupted, emergency procedure is required to overcome potential hazards and if continued operation on a limited basis is impracticable, the plant must be shut down as far as possible. The emergency procedures attempt to overcome the hazard of quick shut down as much as possible.
Emergency can result from equipment failure and from interruption in utilities or feed supply or an interruption in the down stream units. Certain features have been designed in the plant to minimize the likely hood of an emergency. These include spare pump, isolation equipments which can be used in case of equipment failures.
Operator should be thoroughly familiar with emergency procedure and understand the reason for each activity. Obviously any written procedure cannot cover all the details or problem, which might arise in an emergency, as the nature and degree of emergency, is not always the same. Under emergency condition, actions are to be taken fast as per the guideline below :
6.4.3.2 MAIN ELECTRICAL POWER FAILURES
Power requirement for the plant is met from the sub-station III which is considered critical and reliable. All pumps will trip. In addition Air cooler fans will also trip.
6.4.3.3 INSTRUMENT POWER FAILURE
Instrument power is provided from 110V-AC power supply system and 110 V-DC power supply system. 110-V-AC power is supplied to various electronic instruments for e.g. Transmitters, Indicators, Controllers, Recorders and Alarm Circuit, where as 110 V-DC is supplied to interlock circuit and shut down system. Battery power will be available for half an hour in case of loss of instrument power, the possibility of instrument power failure from battery back up is remote.
Effort should be made to evaluate if instrument power is likely to be restored in the half an hour time, during which power from battery back up will be available. In case instrument power is not likely to be restored in half an hour time, plant shut down should be taken as quickly as possible.
However in the event of loss of total instrument power, the following will occur:
All control valve will assume fail safe position. Check liquid feed to the unit is cut off. There will be no indication of operating parameters in control room as indication of operating parameters in control room as transmitters will cease to function. Ensure fuel gas is cut off to Heater - reboiler. Isolate column feed and product streams and check for closing. If column pressure tends to rise, depressurize at a slow rate of opening bypass valve PV-1308 B1, B2. Stop all the pumps. Fuel gas to heaters isolated. Watch for pressure, temperature and levels in various equipments.
Release to flare and drain to blow down / storage to keep conditions under control.
Restart unit as per normal procedures when instrument power supply is resumed.
6.4.3.4 LOSS OF INSTRUMENT AIR- FAILURE
Instrument air is used in this plant for actuation of control valves. Chances of continued stoppage of the compressors are remote as they get power supply from the Co-generation plant. The possibility of total instrument or air failure is remote. Stop all the pumps. Ensure fuel gas is cut off to Heater reboilers. Isolate column feed and product streams and Naphtha column gases are isolated, if column pressure tends to rise, depressurize by opening the bypass valve of PV-1308 B1, B2.
Isolate fuel gas to heaters, watch for pressure, temperature and levels in various equipments. Release to flare and drain to blow down / storage to keep conditions under control.
6.4.3.5 LOSS (FAILURE) OF COOLING WATER
Failure of cooling water will be indicated audio-visually by a low pressure alarm PSL-1401 installed on the supply header. In the event of such a failure, not much of problem is envisaged.
When cooling water is restored, restart the ARN / KERO TRIM Coolers as per usual procedure.
6.4.3.6 HEATER TUBE FAILURE
The following actions need to be taken. Cut off heater firing and open snuffing steam to furnace. Shut off NGL flow through the furnace. Close block valves at furnace inlet and outlet. It will not be possible to continue plant operation as long as planned shut down to attend to the leak in heater tube is taken.
6.4.3.7 LOSS OF LP STEAM
Loss of LP steam may not affect the operation of KRU as LP steam is utilized at utility stations, snuffing in furnace and in steam tracing.
HEATER OPERATING PROCEDURE
H-901 & H-902
Part of the KRU Operating Manual
HZR/ISO/DEO/KROO1
PART VII
7.0 HEATER DRY OUT PROCEDURE
7.1 REFRACTORY DRY OUT SCHEDULE FOR HEATERS H-901 & H-902 FOR KRU
Step 1 From ambient to 110°C @ 25° C/hr 4 hrs.
Step 2 Hold at 110°C for 12 hrs. 12 hrs.
Step 3 Raise from 110°C to 200°C @ 25° C/hr 4 hrs.
Step 4 Hold at 200°C for 12 hrs. 12 hrs.
Step 5 Raise from 200°C to 400°C @ 25° C/hr 8 hrs.
Step 6 Hold at 400°C for 24 hrs. 24 hrs.
Step 7 Raise from 400°C to 500°C @ 25°C / hr 4 hrs.
Step 8 Hold at 500 ° C for 24 hrs. 24 hrs.
Step 9 Cool from 500 °C to 200°C @ 50°C/ hr 4 hrs.
Step 10 Allow natural cooling from 200°C to 6 hrs
ambient temp with sealing of all opening.
98 hrs.
NOTE:
Steam shall be introduced through tubes during dry out operation above 200°C.
7.2 HEATER DRYOUT PROCEDURE FOR 90-H-901 AND 90 -H-902
The refractory in the Fire Box (burner flooring) & convection zone of the heater 90-H-901/90-H-902 is dried out by lighting burners while M.P.Steam (or LP. steam in case M.P. cannot be made available), is flowing through the coil tube. Steam flow should be adjusted to prevent overheating of coils.
Dry out of the heater refractory is performed at the lowest possible fuel pressure with combustion air control by adjusting air registers of burners at lowest possible flame (non-radiant flame) to prevent burner block and adjacent refractory from over heating.
Lighting Burners of Heater
Commission the fuel system as described in initial start up.
Open air register of all burners.
Check that fuel isolation valves of all burners are closed.
Check the furnace for explosive atmosphere and any combustible materials to ensure proper purging of furnace. Purging shall be carried out with steam / air for 30 minutes followed by gas free test.
Light the pilot burners of all burners.
Reset manual of SDV 1201/ SDV 1301.
By pass tripping inter lock from DCS PB Control room.
Press push button on fuel gas main control panel which open PV control valves PCV -1201 / PCV 1301 and fuel gas header will be pressurized to about 2 kg/cm2 – up to block valve.
Crack open fuel valve of particular burner to be lit first.
Adjust the fuel gas in such a way that rise of temperature is controlled. Flame should not be radiant to avoid detrimental affect on the block of burner and adjacent refractory due to thermal shock.
Raise the temperature of installed castable @ 25° C per hour from ambient temperature to 100/110°C.
Maintain 100 - 110°C for 12 hours ( SOAKING).
Raise the temperature from 110°C to 200°C @, 25°C per hour.
Maintain 200°C for 12 - 14 hours. Introduce flow of steam through coil tubes after making sure that all the condensate has been drained off.
Raise the temp. from 200°C to 400°C @ 25°C /hr. Hold at 400°C for 24 hrs.
Increase temp. from 400°C to 500°C @ 25°C /hr. Hold at 500°C for 24 hrs.
Light other burners to maintain the rise of temperature of 30° e required by the dry out schedule the same way as described for the first burner to achieve desired temp.
It is good practice to check each burner for good operation and any leak in the beginning itself by lighting each burner for few minutes where after it is put off and lit another burners so on.
Rate of cooling down of refractory of heaters after completion of dry out should be 30-50° C per hour till it comes down to 200°C and cut off all burners to allow the fire box to cool further naturally. At this point, flow of steam through coil shall be cut off. All the openings shall be sealed at the time of natural cooling.
Inspect fire box and convection section for any damage in refractory after the fire box has cooled down to atmospheric temperature.
During the dry out a regular check of the refractory casing is necessary. The normal casing temperature should be less than 100° C. If hot spots occur which is a sign of an accumulation of moisture or damage of refractory, additional holding (soaking) time is required.
During the dry out schedule precaution should be taken that temperature change (increase / decrease) should be limited to 50° C / hr till the system cools down to atmospheric temperature.
Requirement for the dry out of refractory of 90-H-901 /90 -H-902
Availability of M.P. Steam with flow meter and pressure gauge.
Temperature monitoring device.
Proper recording system for temperatures and pressures.
Silencer at steam vent.
Heater duct (furnace) draft monitor device.
DCS system to be fully operational at Control Room for monitoring of dry out, trending and historical trending, alarms, etc.
PART VIII
8.0 BURNER OPERATING PROCEDURE

OPERATION

Warning!
Do not attempt to operate burner without first reading these instructions and reviewing the burner drawing and capacity curve!
Loss of life and damage to equipment may result.
8.1 PREPARATION FOR LIGHTING BURNER
A. Check the furnace operating manual to make sure all requirements for preparing the furnace for a light-off have been met.
B. Make sure all fuel supply valves are closed, this is to include control valves and manual shutoff valves, if present.
C. Open the burner air inlet damper to the full open position.
D. Open the furnace stack damper to the full open position.
E. Allow the furnace to purge for not less that five (5) furnace volume changes.
NOTE: Minimum purge time should be 15 minutes
8.2 PILOT LIGHTING INSTRUCTIONS

Warning!
If the heater is not sufficiently purged, an explosion may result causing serious damage to equipment and loss of life.
See STIS pilot drawing BUEOI305-603; portable igniter drawing BUEO1305-400 and the installation, operating and maintenance instructions for the high energy igniter in Section 4 or this manual.
Note that this design of gas pilot incorporates an integral igniter guide tube adjacent to the gas pilot. Holes in the interconnecting pilot shield allow cross ignition of the pilot flame from a portable electric igniter.
A. Adjust the stack damper so that the proper draft level for furnace operation is achieved.
B. Close the burner air control damper to the 25% open position.
C. Make sure the individual gas valves to the pilots are closed.
D. Open the main pilot fuel supply valve making fuel gas available to all of the individual valves which should be closed.
NOTE : Check the pilot fuel piping for leaks before proceeding. If leaks are detected, all fuel supply valves should be shut-off and the leaks fixed before lighting the burners.
E. Remove the protective slide-on cap from the end of the portable igniter lance.
F. Insert the portable electric igniter lance into the igniter guide tube and clamp it in the correct position for pilot ignition. Note that the portable igniter lance is provided with an adjustable stop and a "screwed" igniter clamp, whilst the igniter guide tube on the pilot terminates with an "adjustable" screwed end (igniter positioner), to accept the screwed igniter clamp on the portable igniter lance.
G. Turn the mains supply isolator switch on the HE Unit to the "on position" and the power on lamp should be illuminated.
H. Slowly open the pilot isolating valve, whilst depressing the ignition button on the HE Unit. The "ignition on" lamp should be illuminated. The pilot should light instantly.
NOTE: If the pilot does not light after 10 seconds close the pilot firing valve and refer to the " Troubleshooting" section of this manual.
I. Turns the mains supply isolator switch on the HE Unit to the "off position" and the power on lamp should go off.
J. Unscrew the igniter clamp on the portable igniter lance from the pilot igniter guide tube and remove the igniter lance from the igniter guide tube. Replace the protective slide-on cap on the end of the igniter lance, if the portable igniter is not to be used again immediately.
K. Adjust the pilot pressure control valve to the design operating pressure of 1.0 kg/cm2 g.
L. Use the sight port to view the pilot flame. If it seems unstable adjust the pilot mixer air door for more or less air, whichever makes the pilot more stable.
M. Repeat for all additional burners.
8.3 GAS FIRING INSTRUCTIONS
Warning!
If the burners are operated without a sufficient air supply, a build-up of gas may occur resulting in an explosion.
Care should be taken to assure proper air for combustion is flowing through each burner at all times.
All burner damper's should be set the same.
A. Adjust the stack damper to give the required draft level at the furnace floor for gas firing.
B. Set the burner air control dampers at 50% open.
C. Make sure the individual burner firing valves are closed.
D. Slowly open the main fuel supply valve allowing gas to flow up to the individual burner tiring valves, which remain closed.
NOTE: Check the fuel piping for leaks before proceeding. If leaks are detected all fuel gas should be shut off and the leaks fixed before lighting the burners.
E. With the pilot flame and air flow established, slowly open the burner fuel gas isolating valve. The burner should light instantly.

Warning!
If the burner does not light after 10 seconds shut the fuel gas off and purge the heater following the" Preparation for Lighting Burner" instructions. If the heater is not sufficiently purged a build-up of gas could occur resulting in an explosion.
F. Adjust the burner to the minimum firing rate as shown on the John Zink Capacity Curves.
NOTE: It is strongly recommended not to operate the burners below the minimum firing rate shown on the data sheets. It could cause the staged and/or primary tips to become unstable. Therefore if the heater needs to be operated at some rate below minimum fire for all burners for dry-out or de-coking then some of the burners should be shut off so the Remaining burners can be operated at or above the minimum firing rate.
8.4 TROUBLESHOOTING
NOTE: This section covers some of the most common problems that we have seen in the field If this, section does not provide you with the required information to correct your problems please contact John Zink Company for assistance.
8.4.1 PILOT WILL NOT LIGHT
If the pilot will not light when the ignition button on the HE Unit is depressed and the pilot isolating valve is opened check the following points:
- The portable electric igniter is not operating (no spark at firing end of igniter lance).
Make sure the power supply is correctly, connected to the HE Unit and that the cable between the HE Unit and portable igniter lance is not damaged.
- The electric igniter is operating (spark at firing end) but not igniting pilot, flame.
Make sure that the igniter rod is inserted in the guide tube the correct amount (see drawing no. BUEO 1305-603). The portable igniter lance is fitted with an adjustable igniter stop (retained by two M3 socket setscrews), which allows the amount the igniter lance is inserted in the guide tube to be varied, when it is clamped in position. Reposition the adjustable igniter stop so that the amount the igniter lance is inserted is varied progressively by 5mm at a time and re-attempt to ignite the pilot. Initially forward of the design position (see pilot drawing) and then backwards from the design position.
Note that the igniter guide tube on the pilot terminates with an adjustable screwed end (igniter positioner) to accept the screwed igniter clamp on the portable igniter lance. This is adjustable (retained by two M5 setscrews) and allows the length of the igniter tube to be varied, so that a single portable igniter lance can be used to ignite several pilot burners. We recommend that this is tack welded in position when its optimum position has been confirmed during commissioning/start-up. This can also be used to make fine adjustments to the igniter lance insertion (+/-10 mm max), rather than use the adjustable igniter stop on the lance, which allows for greater adjustment.
- The burner air inlet damper is more than 25% open.
This could cause the pilot flame to "blowout" because of too high a level of air to stabilize the pilot particularly when the furnace is hot. Close the burner damper further and try again.
- The air door on the pilot mixer is not set correctly.
The suggested starting location of the pilot mixer air door is 50% open. If the mixer air door is closed too far the pilot may not be inspirating enough air for combustion and proper pilot operation. If the air door is open too far it may be inspirating too much air and therefore the mixture is too dilute to burn. Adjust the pilot air door as required.
- The mixer body is plugged.
If the mixer body is plugged with foreign material, it will not allow the fuel and air mixture to pass. Follow the maintenance instructions in this manual to clean or replace the pilot mixer.
- The pilot tip is plugged.
If the pilot tip is plugged with foreign material it will. not allow the fuel and air mixture to pass. Follow the maintenance instructions in this manual to clean or replace the pilot tip.
- The pilot orifice at the base of the pilot mixer is plugged.
If the orifice is plugged with foreign material it will not allow the fuel to pass. Follow the maintenance instructions in this manual to clean or replace the pilot orifice.
- Fuel is not being supplied to the pilot connection.
Check to make sure all fuel supply block valves are open up to the pilot firing valve and that there are no leaks in the piping system and that none of the fuel lines are plugged.
8.4.2 PILOT IS UNSTABLE
If the pilot flame appears to be unstable after light-off check the following points:
A. The fuel gas pressure is not within the operating range shown on the Data Sheet.
If the fuel pressure at the pilot is not within the operating range shown on the Data Sheet then it could be inspirating too much or too little air to sustain combustion. The pilot orifice, mixer, or tip could also be plugged causing this problem, see points below.
- The air door on the pilot mixer is not set correctly.
The suggested starting location of the pilot mixer air door is 50% open. If the mixer air door is closed too far the pilot may not be inspirating enough air for combustion and proper pilot operation. If the air door is open too far it may be inspirating too much air and therefore the mixture too dilute to burn properly. Adjust the pilot air door as required to stabilize the pilot.
- The burner air inlet damper is more than 25% open.
This could cause the pilot flame to "blowout" because of too high a level of air to stabilize the pilot, or enough of an ignition source. Close the burner damper further until the burner is in full operation and the heater is brought up to temperature.
- The mixer body is partially plugged or damaged.
If the mixer body is partially plugged with foreign material, it will restrict the flow of the fuel and air mixture making the flame unstable. Follow the maintenance instructions in this manual to clean or replace the pilot mixer.
- The pilot tip is partially plugged or damaged.
If the pilot tip, is partially plugged with foreign material, it will restrict the flow of fuel and air mixture making the flame unstable. Follow the maintenance instructions in this manual to clean or replace the pilot tip.
- The pilot orifice at the base of the pilot mixer is partially plugged or damaged.
- If the orifice is partially plugged with foreign material, it will restrict the flow of fuel making the flame unstable. Follow the maintenance instructions in this manual to clean or replace the pilot orifice.
8.4.3 BURNER WILL NOT LIGHT OR BECOMES UNSTABLE
If the pilot flame is established and the burner will not light when the fuel gas valve is opened or if the burner becomes unstable during operation then check the following points:
A. The pilot flame is unstable and is not providing a good source of ignition to the burner.
Check the section above concerning the stability of the pilot: If the pilot cannot provide a strong source of ignition for the burner it may not light-off and/or may not remain stable in a cold furnace. Check the location of the pilot tip.
- Fuel is not being supplied to the burner gas connection(s).
Check to make sure all fuel supply block valves are open up to the burner firing valve(s).Make sure that there are no leaks in the piping system and that none of the fuel lines are plugged.
- The burner air inlet damper is more than 50% open.
This could keep the burner flame from remaining lit because of too high a level of air passing through the burner throat to stabilize the flame therefore causing the flame to "blow-out". Close the burner air damper until the burner lights off and is stable. Once the furnace is in full operation and up to temperature. this problem will usually be eliminated.
- The fuel gas tips and/or risers are partially plugged or damaged.
If the gas tips and/or risers are partially plugged with foreign material, it will restrict the flow of the fuel making the burner unstable. If the tips and/or risers are damaged such that the gas is allowed to bypass the ports drilled in the tip and leak out through a crack or threads, then the burner may not light or will become unstable. This could also cause serious damage to the burner parts and create a dangerous situation. Follow the maintenance instructions in this manual to clean or replace the gas tips and/or risers.
- The gas tips are not oriented or positioned correctly.
If the gas tips are not oriented or positioned correctly the ignition and stabilization ports will not be directed towards the ignition source and low pressure stabilization areas. Refer to the maintenance section of this manual. the burner drawings, and the installation section of this manual for instructions on disassembling and correcting the problem.
- There is not sufficient oxygen to support combustion.
Check the firebox oxygen level to make sure there is some excess O2, in the heater, If there is no excess oxygen present in the firebox extreme caution should be-used. See the WARNING below for instructions. If the O2 meter shows an excess of oxygen out the stack, the burner still could be short of air due to leakage in the furnace.

Warning!
Never open the burner air damper, increase the combustion air flow, or shut off a burner when the firebox is short of air; an explosion may result. Decrease the fuel rate in steps not to exceed 10 %, allowing the oxygen level in the firebox to stabilize between each step, until the required excess air level is achieved.
8.4.4 FUEL PRESSURE DOES NOT MATCH CAPACITY CURVES
If the fuel pressure does not correspond to that shown on the capacity curve then check the following points:
A. The fuel gas composition does not match that of the design fuel.
Check the fuel gas composition against that of the original design fuel. An increase or decrease in the inert content (CO2) or other components will cause the heat content of the fuel to vary and therefore the fuel pressure will change.
B. The fuel pressure gauge is not located correctly.
Make sure the pressure gauge is located as close to the burner gas connections as possible and that there are no valves between the gauge and burner. The pressures shown on the capacity curves are for the burner only and do not include any piping, valves, fittings, etc. that may also be in the system.
C. The gas tips are not drilled correctly.
Check the ports on the gas tips against the drilling information shown on the burner GA drawing. The drawing should show the number and size of the ports. If over time the ports have been enlarged from wear and do not match the information on the drawing then contact John Zink Company to obtain replacements parts.
D. The fuel gas tips and/or risers arc partially plugged or damaged.
If the gas tips and/or risers are partially plugged with a foreign object or material then it will restrict the flow of the fuel making the fuel pressure required to obtain a specified heat release higher than that shown on the capacity curve. If the tips and/or riser are damaged such that the gas is allowed to bypass the ports drilled on the tip and leak out through a crack or threads, then the burner may not release the required amount of heat at the pressure stated on the capacity curve. This will give the false impression that more pressure is required to make a certain heat release. This could also cause serious damage to the burner parts and create a dangerous situation. Follow the maintenance instructions in this manual to clean or replace the gas tips and/or risers. |
E. The method or measuring device used to determine the heat release or fuel flow to the burners is incorrect.
Check the accuracy of the instrumentation used to measure the fuel flow and fuel pressure. If the heat release being used to check the operating pressure of. the burners is false then the pressure will appear to be incorrect when it is actually not.
8.4.5 CANNOT ACHIEVE AIR FLOW CAPACITY
If the burner heat release is limited by the amount of air it is able to pass, check the following points:
A. The burner air damper is not in the correct open position or is not open at all.
If the burner air damper is not open to the correct position, then it will require more draft to pass the required amount of air. If there is no more draft available then the burner will run short of air.
- The draft at the floor of the heater is not at the correct level for operation.
If the stack damper is not in the correct position the draft level at the floor of the heater could keep the burner from passing the amount of air required for combustion.
- The burner air damper is blocked or plugged with a foreign object.
Check to make sure that there is no debris blocking the air inlet to the burner. This will restrict the air flow to the burner at the design conditions.
- The instrumentation used to check, the oxygen level in the stack is not functioning properly and /or there is leakage in the furnace.
This problem can be quite severe because the O2, level in the stack is a false reading and in actuality the burners are running short or air. Check the O2 meter make sure it is operating correctly and has been calibrated recently. Check the sample line to make sure it has no openings where air can be pulled in. Check the heater to make sure there are no open sight doors or any other openings which would allow air to be pulled into the heater at any location other than the burner air inlet. Almost all cases where excess oxygen is measured in the stack will have incorrect readings due to leakage in the convection section.

Warning!
Smoky or hazy flames can be the result of insufficient air to the burners. Always check the firebox oxygen level before making any adjustments to the burners, If the firebox is short of air do not shut off a burner open the burner damper or increase the flow of combustion air, or an explosion could result. Decrease the fuel rate in steps not to exceed 10 %, allowing the oxygen level in the firebox to stabilize between steps until the required excess air level is achieved.
PART IX
9.0 FURNACE STARTUP PROCEDURE CHECK-LIST
9.0 FURNACE START UP PROCEDURE/CHECKLIST
1. Check stack damper opening (at Control Room/Field), normal opening for H-901 = 65%, H-902 = 95% (at present).
2. Ensure that isolation valves of all burners of pilot as well as main are closed.
3. In case of restart of furnace after trip/extinguishing of burners including pilots:
i) Ensure SDVs (SDV 1201 for H-901 SDV 1301 for H-902) are in closed position & C/Vs of Burners.
ii) Allow at least 10 min. purging of the furnace with air before lighting up pilots.
4. For Lighting up pilot burners, open Air dampers to 20%-25% (at "2" on "8" number scale)
5. Ensure FG line-up to Main & Pilot burners of H-901/H-902.
6. Ensure FG line free of any Liquids and then line up main fuel gas (FG) isolation valves of H-901 & H-902 from FG header.
7. Back Pressure of Pilot burners to be maintained at 0.4 kg/cm2(g). Light up pilot burners one by one using igniters. Allow at least 5 minutes purging time between successive attempts if pilot is not getting lighted.
After Light-up, put off Power Switch of ignitor and keep it in its holder.
8. Now, before lighting up the main burners, air dampers to be opened up to 48 to 50% (at '4' on '8' number scale).
9. Take the liquid feed to furnace passes. Ensure the flow rate to be maintained above Low-low trip value. (FLL). For H-901-FLL at 12 m3/hr each (2 pass) H-902 - FLL at 13.5 m3/hr.
10. After ensuring the flow through the furnace, Pressure Low-low (FLL)-Trip of fuel by pass timer switch to be pressed from Control Room and Later the SDVs (1201 for H-901 & 1301 for H-902) to be latched from field to open. Open FG flow Control Valve (FV 1203 for H-901, FV 1303 for H-902) so that the down stream F.G. Pressure be above Pressure low-low trip (0.4 kg/cm2).
11. Light up main burners one-by-one by opening the burners FG isolation valves slowly. Don't allow the FG Pressure drop below PLL Trip value 0.4 kg/cm2 during lighting up of the burners. Ensure back pressure of FG D/S of FV around 2.0 kg/cm2 after lighting all burners.
12. Check the draft gauges of H-901 & H-902 for any wide fluctuation/abnormality/positive pressure at field & Control Room. Stay away and observe from inspection window while fuel gas flow through burners. Running fire water hose to be kept accessible near heater.
13. Increase/Decrease the firing of the burners slowly. Similarly Stacks Air Damper also to be operated slowly.